The error messge “WARNING: A fatal error appeared during the geometric scan of the projector”indicates, that the current scan doesn’t retrieve suitable data. This is most likely because of camera, projector or external reasons. Especially, if this happens “out of the blue” (worked once before), there are likely external reasons that jeopardize the scan of one or more specific projectors.
Check your system in this order:
- Check the “before-after” situation:
- If it worked some time, and then suddenly not: Analyze and track down what might have changed and revert to the working situation
- Examples:
- Worked in the evening but not at noon => probably an ambient light issue
- Worked until we changed the network => new network devices messing with the camera performance
- Worked for x years in a fixed installation => probably camera got too dirty, or projectors aged to a critical threshold
- Check the camera:
- Image OK (focus, iris, exposure, zoom)?
The projection must look sharp and constrast-rich in the camera image, and must fill as much as possible of the camera image; also check if the lens is dirty.
- Signal ok (no noise, lens flare, etc)?
Noise and lens-flares must be avoided by all means, use eventually the threshold in the camera settings.
- Bandwidth sufficient (for network cameras)?
Often, insufficient switches and routers set the camera speed down to 1/10th of the bandwidth which causes such errors. Make sure, the camera operates on 1 GB/s.
- Make sure, nothing is blocking the camera view.
- Make sure, the camera is placed firmly – movements, vibrations, etc. must be avoided by all means.
- Check the projectors:
- Unfocused projectors can cause this error. Make sure all projectors are focused everywhere on the projected surface
- Check the projector signal: Bad video signal (noise, image drops, etc.) cause this error, too
- Shaking: If projectors move (even slightly) during the scan, it can cause such error. Make sure, projectors are rigged properly; if hanged, wait until movement stops.
- Projector aging: If a projector gets “weird” because of aging effects, it affects the scan stability
- Make sure, nothing is blocking the projector beam, unless masked properly in the camera image
- Check the surrounding:
- Make sure, nothing is blocking the camera view or the projector beam.
- Block external light: Turn off any directed light (spots, etc.), reduce ambient light as much as possible.
- Avoid sunlight: Direct sunlight spoils scans even in small does, ambient sunlight also has already a severe effect. If in doubt, try the calibration at night.
- Check the projection surface:
- Check if something happened on the surface. E.g. if it got less diffuse, more shiny, etc.
- Especially when using inflatable screens – are there wrinkles, folds, etc. that appeared because of less pressure? If so, manage the pressure.
- Check disk space / RAM:
- Check if the drive where VIOSO is installed (by default C:\) has enough free space (at least 5 GB).
- Check in “Windows Task Manager > Performance (tab) > Memory” if the extrapolation or blending calculations push the memory usage to the limit (100%).
This is an error from an overloaded GPU. Read here how to resolve:
/knowledgebase/dealing-with-tdr-error-message/
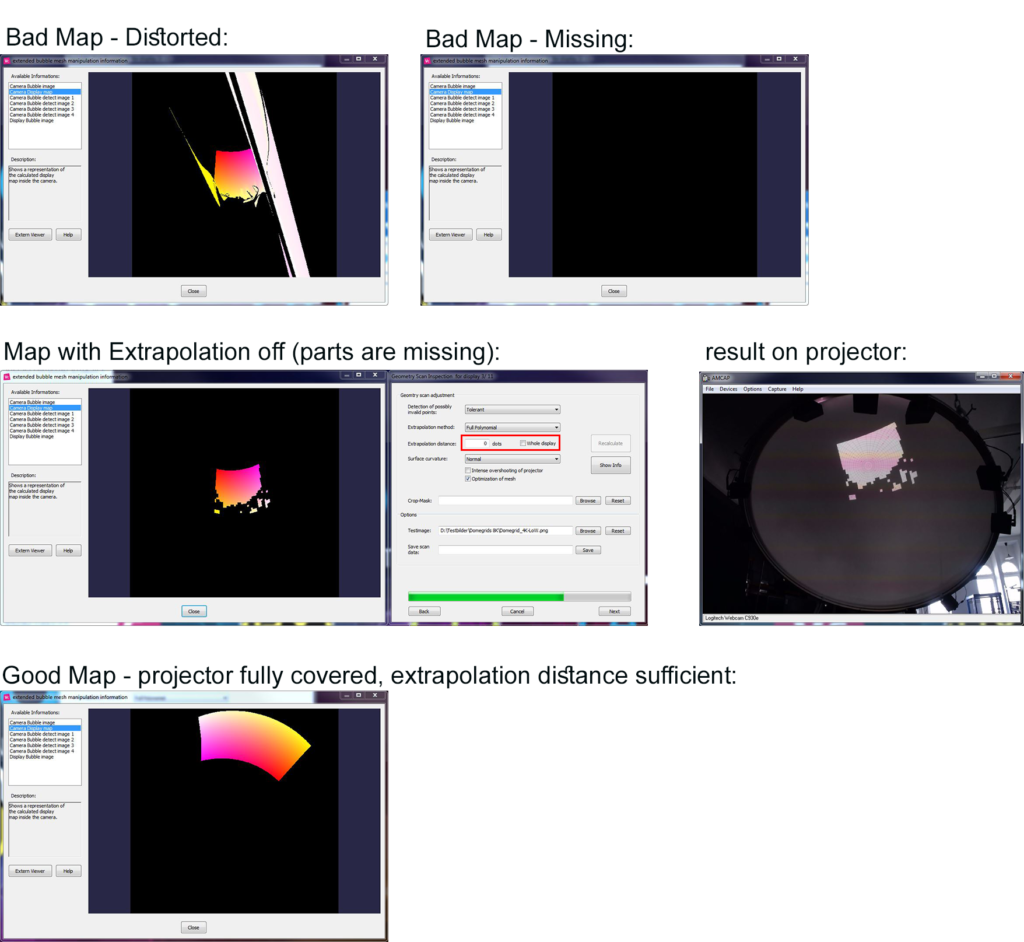
This issue often happens because of extrapolation errors when using “Curved screen/Dome” scanning method. The maps generated after each scan are bad, which (unfortunately) causes the blending calculation to crash. To resolve, you need to redo the scans and make sure, to have valid generated maps. Follow these instructions after each scan carefully:
- When using a fisheye camera, set the Surface Curvature to “Slight” (since for a fisheye, a dome or curved screen is not curved anymore)
- Deactivate the extrapolation distance (unmark the checkbox and set the distance to 0
- Hit “Recalculate” and open “Show Info” Dialog. There examine the “Camera Display Map” image. This image must show an uninterrupted gradient from red/yellow to pink/white.
- You will notice that parts of the projection are not covered anymore. That’s because the extrapolation is deactivated. Increase the distance step by step, always hitting “Recalculate” until all visible projected areas are covered with the testing pattern. View the “Camera Display Map” to be still a proper looking gradient.
- Keep an eye on disk space & RAM:
- Check if the drive where VIOSO is installed (by default C:\) has enough free space (at least 5 GB).
- Check in “Windows Task Manager > Performance (tab) > Memory” if the extrapolation or the final blending calculations push the memory usage to the limit (100%).
Once all projectors are handled this way, having a proper projector map, the blending calculation won’t crash.

There are different reasons of such behaviour so we will go through all of them starting from very obvious.
A. Check if the camera cap is still on
Yes, yes it happens so often, so its definetely worth to check one more time.
B. Check the camera adjustments
Both mechanical and software: it can be that black screen is simply way too dark image that camera streams to you. Make sure the iris of the lens is not totally closed. In driver settings (buttons Format and Options) reduce fps and increase exposure times until you will see the image.
C. Directshow Filter problems
When everything else is checked, the reason of black image stream can be the DirectShow failure. This can be double check using following steps:
-
Use AMCap Direct show tester.
It comes preinstalled with every VIOSO software. Run the AMCap, select you camera in devices and start Preview. You will see right away if the picture is not shownor even some error message comes up. In the meantime, you can monitor the connection to the camera in IDS camera manager: if you notice that camera dissapears for a short moment when directshow filter is initialised – its an indication of the problem.
-
In VIOSO Calibrator, if the software cannot get the image from direct show, you will notice also the masking tools are blacked out in the “Adjust Camera” dialog.
-
C. Other hints
Here are some hints which can help you to solve this problem. Any of this single steps can help. Please check if the camera starts to work, after each step, so you wont need to perform further steps.
-
Reinstall the IDS driver. To make it in a proper way
- Perform a clean uninstall first
- Reboot
- Install the driver again
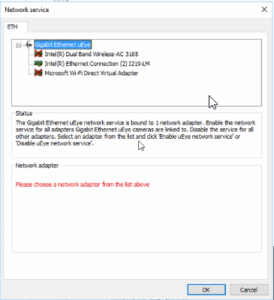
- Disable Gigabit Ethernet uEye Filter driver for the other network adapter which are not used

-
Assign persistent IP adress to a camera.
To do so, go to Manual ETH configuration for the selected camera in IDS Camera Manager
-
Reinstall the Gigabit Ethernet uEye Filter driver, because sometimes there is a older version active und that doesn’t work together

If the IDS camera looses its basic settings, e.g. color format, timings, etc., there might be an issue with the DirectShow driver that is utilized to handle the camera. Some hints that might fix this issue:
- Register the DirectShow driver anew:Open a commandline with Administration privileges
Execute C:\Windows\System32\regsvr32.exe uEyeCapture.ax

- Open the SPEASY.ini next to the executable of the calibration software and double check this settings:
bInitCameraParamFromCalib="1"
bInitCameraModeFromCalib="1"
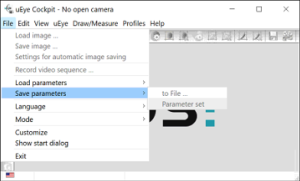
- Launch uEye Cockpit, make appropriate settings and save them as camera parameters:

In some cases, when you start the camera-based calibration, this message appears:
“The projection surface could not be identified. If this is intended, push the NEXT button. Otherwise, click on the BACK button and adjust the camera.”
The reason for this issue is in the misoperation of the camera.
- Camera image is too dark to detect any projection. Re-adjust the camera. Check here for how to adjust the camera.
- IDS camera works on 100 Mbits/s. Control of the network adapter, and switches and hubs are 1Gbits/s compatible. Check the cable for the 1Gbit/s compatibility. Note that sometimes broken ports or cables can continue to work, but drop the bandwidth from 1000 to 100 Mbits/s. Read here for how to configure an IDS camera.
This error can happen because a required programming runtime environment is missing on your system. Please download and install the runtime environment provided by Microsoft:
After a reboot, this error should be gone and the application should start normally.
If the error still occurs, there could be an issue with the DirectX runtime (see Installing DirectX Runtime).
Our logging file is located in the working directory. This is usually in C:\Users\Public\Documents\VIOSO
To change the logging value, next to an executable, there is a file called SPeASY.ini. There you will find the attribute LogFileLevel in
<VIOSO\SPeASY\DebugOptions\ErrorHandling>
Standard value is 1. Set this up to 3 to have more detailed logging.
- The split mode may be set incorrectly. Check your settings in the calibrator options.
- The version of DirectX on the server might not be up-to-date. Update DirectX to the lastest version (read more about this here: Installing DirectX Runtime).
At the startup of an application, an error message like this is shown:
„d3dx9_40.dll“ or „d3dx9_43.dll“ is missing on your computer.
Reinstallation of the application could solve your problem.
An outdated, incomplete, or missing DirectX 9 runtime is the most likely reason for this error. You basically just need to (re)install it as an administrator.
See here how to install or update DirectX:
Installing DirectX Runtime


