Table of Contents
Preface
You can calibrate cylindrical panoramas using VIOSO technology with one single camera. This can be done by placing the camera with a fisheye lens in the center of the panorama.
Please note:
This section covers the workflow when going by the free mode of VIOSO 6 or Anyblend 5, and therefore does not use 3D-based calibration techniques. If possible, go for the 3D-based approach of VIOSO.
Lens and camera location must allow to scan the entire inner surface of the panorama cylinder with a single camera.

Suitable for:
- Any radius (typically 90°- 360°).
- Horizontal alignment of projectors (cross shooting).
Benefits:
- Extremely fast and predictable setup.
- Automatic geometric alignment.
- Automatic recalibration possible.
- Avoids using multiple cameras, preventing higher costs and installation efforts.
Requirements:
- A single fisheye camera must sit in the very center of the screen diameter–either on the top or bottom.
- All projected images must be visible from the camera point of view.
- The content exists in 2D–an “unwrapped” view of the content in the aspect ratio of the curved screen.
- A license of VIOSO Calibrator supporting the conversion task “fisheye to cylinder”.
Limitations: Not suitable for center mounted projectors (blocking camera field of view).
Workflow
Running a 360° calibration using a center-mounted fisheye camera requires two steps:
- Calibration from the fisheye view resulting in the aligned projectors.
- Transformation to the flat view (“unwrapping”) of the designated content, resulting in the final content mapping to the screen.
1. Calibrating from fisheye view
- Set the camera exactly in the center and on top of the screen. Leave margin as required to have an unobstructed view through the fisheye lens to all projected images.
- Calibrate all projectors using “curved screen/dome” preset.
- Choose “arbitrary alignment”!
Notes for improving the calibration procedure:
For a center mounted camera, recognizing the testing patterns properly is a challenge. There are some hints that help to maintain a good test pattern recognition:
- Set projector masks before running the calibration scans: Calibration step “additional option” click button “Extended Options” and check the box “set display calibration mask”.
- Before starting the scan, create an indivdual mask for each projector on-the-fly. Use this mask to cut off pixels that go beyond the screen (“overshooting”). By blacking out these pixels, wrong pattern detection is minimized, and the overall image quality improves.
- Please save each for re-usage with future calibrations:

2. Align using “Fisheye-to-Cylinder” Testpattern
After the scanning, make the proper fisheye to cylinder mapping:
- Use the specific “fisheye to cylinder” testing pattern (comes with the Calibrator installation. Also attached to this FAQ).
- Map the latitudes parallel to the screen top and bottom. Use only the edges of the warping grid.
- Rotate the warping grid so that the “180°” longitude of the testing pattern is where the center of the content should be located. In other words: The 360°/0° position is where the left side of the content and the right side of the content meet.
- Improve the mapping by carefully moving the corner points. Try not to increase the number of rows and columns on the warping grid–a more precise mapping can be done in the second step.
- Save this calibration, indicating in the file name that this is the fisheye mapping (e.g. “fisheye_xxx.sps”).
3. Transforming to flat mapping
The last step is the fisheye to flat conversion. Since this step is irreversible, operate on a copy of the previous generated SPS file (“e.g. convertex_xxx.sps”).
- This step transforms the calibration from a fisheye perspective to a flat perspective–a rectangle view on the cylindrical screen as the content should be. This step comes after the initial calibration and mapping of the special fisheye image is finished with a best-possible result.
- To perform the transformation, load the calibration containing the fisheye mapping, or simply proceed with a currently active calibration.
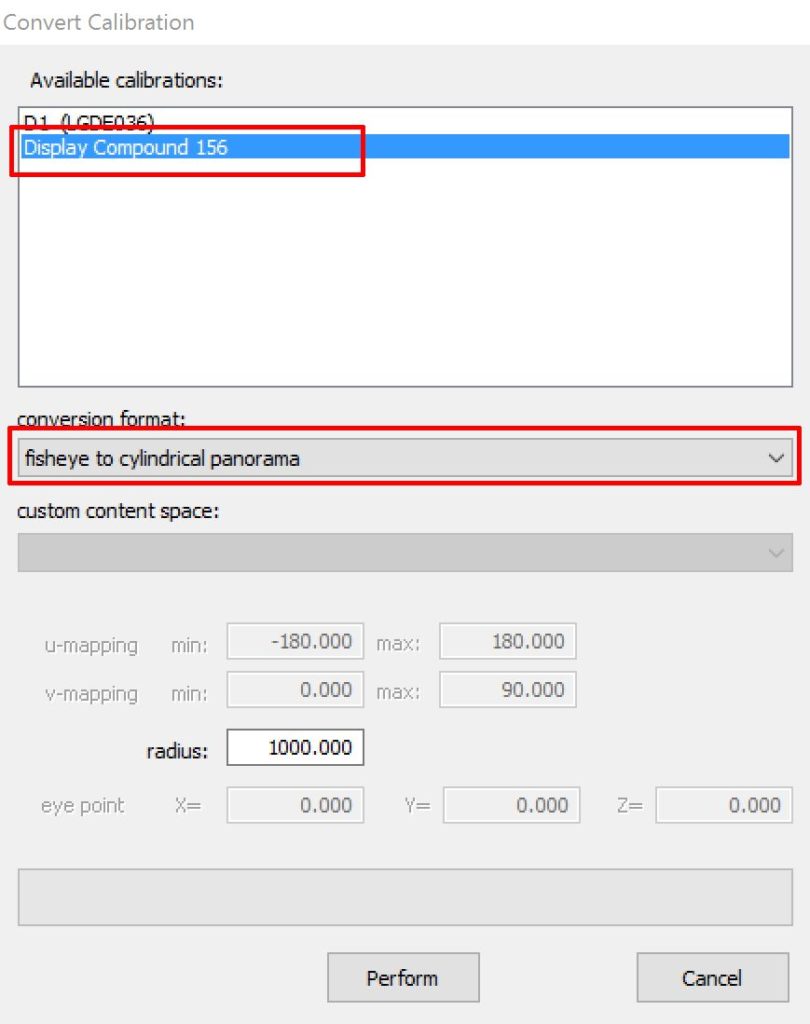
- In VIOSO Calibrator, launch Menu “Calibration”–“Conversion Tasks”.
- Select the “display compound” representing the current calibration.
- Select from the dropdown “fisheye to cylindrical panorama”.
- Click “Perform” (do not alter any other parameter).
- Note: This step is not reversible!

- Now the calibration is transformed to a flat view.
- The testing pattern “fisheye to cylinder” will not look good anymore.
- Load a testing pattern with the aspect ratio of the content, or a snapshot of the content itself. You can use the online TestPattern generator to create a testing pattern in the required aspect ratio: VIOSO TestPatterngenerator
- Make the final adjustments in warping (fine-tune the alignment to the screen borders, etc.) and blending. Use projector masks to cut overshooting pixels, since an alignment that is solely warping-based can be difficult to achieve.
- Make the final adjustments in blending (“Color and Blending”) and individual projector brightness/colorimetry (“adjust projectors”). Please note that only an edge-to-edge alignment (“horizontal strip”) of the projectors will create a high-quality softedge blend.
- Save the result with a different name, since the transformation is not reversible (e.g. “flat_xxx.sps”).
The calibration is now finished and is ready for use with the designated image generating application.