
Table of Contents
Main window explained
EXAPLAY runs its user interface in a webbrowser. After install, click the EXAPLAY icon or launch a browser and type “localhost” to get the user interface shown. You can access the EXAPLAY user interface from another machine by typing the IP of the PC that runs EXAPLAY. The network must be set appropriate for this to work.
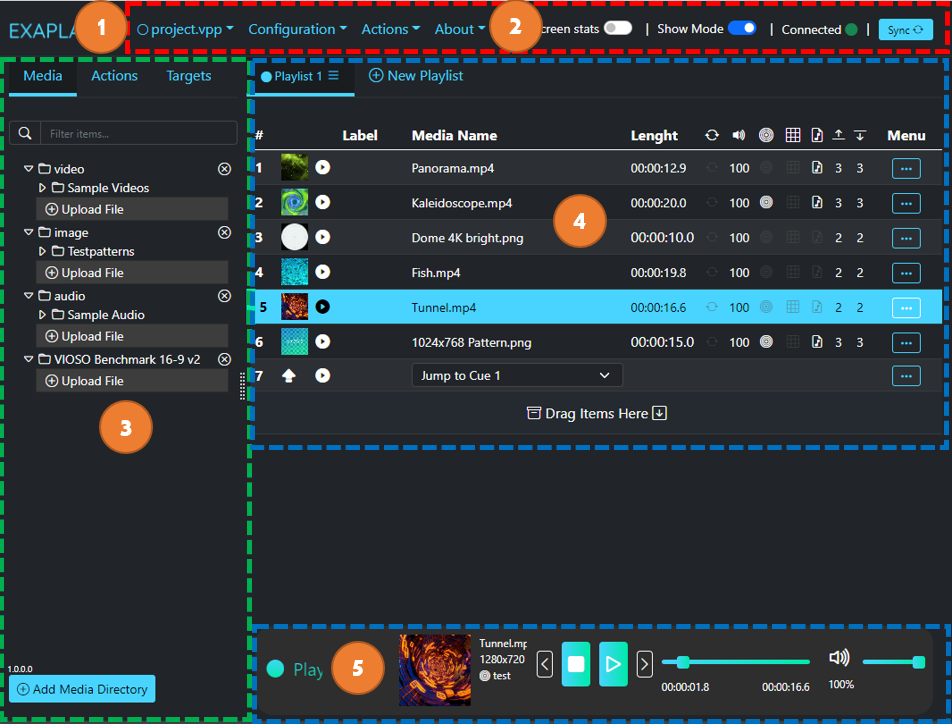
- Main Menu
- Action Buttons
- Left Pane
- Playlist
- Playback Bar
(1) Main Menu
See EXAPLAY Settings
(2) Action Buttons
- Onscreen Stats: Toggle display of syncbars
- Show Mode: Toggles the video output
- Connected: Displays the status between the user interface and EXAPLAY server
- Sync: Re-syncs the user interface with the EXAPLAY server
(3) Left Pane
Tab “Media”
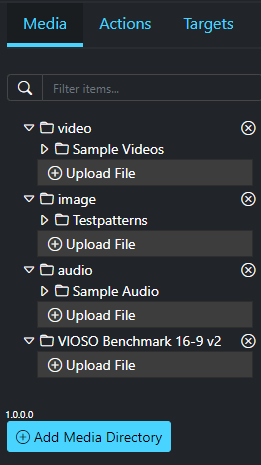
Displays the available media items (videos, images, audio files). Media items are placed in the playlist via drag & drop.
Searches in the paths set in Menu-Configuration-System Paths:
- User’s Document folder / Exaplay / audio
- User’s Document folder / Exaplay / image
- User’s Document folder / Exaplay / video
New pathes on the local system can be added by clicking “Add Media Directory”.
When operating from a remote machine, use “Upload File” to transfer new content from the remote machine to the PC running EXAPLAY.
Tab “Actions”
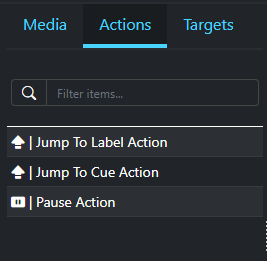
Provides Actions to be inserted into the Playlist via drag & drop.
- Jump To Label Action: Starts the playback from the cue with the specified label. Useful, e.g. if you always need to trigger a certain “idle” content, so you would label this cue “idle” and address via Jump To Label Action.
- Jump to Cue Action: Starts the playback from the cue with the specified number. Useful, e.g. if you always need to trigger the first position in the playlist, so you would go via Jump To Label Action with Cue 1.
- Pause Action: Pauses the playback until further action.
Tab “Targets”
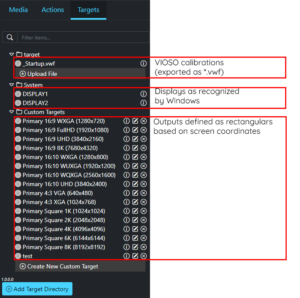
Targets define the output for EXAPLAY. A target can be local monitors, parts of the desktop or VIOSO calibration files.
- Searches in the path set in Menu-Configuration-System Paths: User’s Document folder / Exaplay / target
There are a couple of predefined targets as well as individual targets available:
- target: contains VIOSO *.vwf calibration files
- System: lists all Windows Desktops
- Custom Targets: Predefined targets and custom created targets (see below)
Examples:
- DISPLAY1″ will create a fullscreen output on that screen, which it typically the primary screen.
- “Primary 16:9 FullHD (1920×1080)” draws a black rectangle starting at 0,0 of the primary screen with 1920×1080 size and outputs all contents there. On a FullHD screen this is the same as selecting the same display as system target.
- “Primary 4:3 VGA (640×480)” draws a 640×480 rectangle starting at the 0,0 coordinate of the primary screen. On typical screens, this leaves a lot pixels of the screen visible, thus being a good way for testing.
Custom Target: Define a rectangle on the Windows Desktop
Click “Create Custom Target” to create a custom target that is defined by it’s desktop coverage. Such targets are defined as a rectangle that are placed arbitrary on the Windows Desktop.
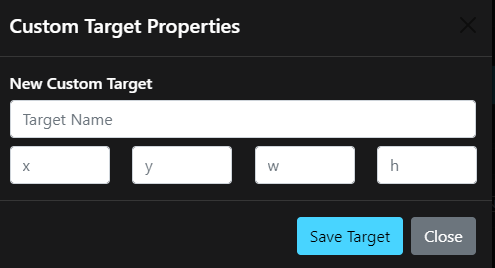
- Target Name: the name of the target for display in the Left Pane
- X, Y: the starting coordinate of the target rectangle, “0,0” is the top-left corner of the primary desktop. Negative values are possible.
w,h: the dimension of the target rectangle in pixels, originating from the X,Y position
Custom Target: VIOSO Calibration
Use VIOSO 6 to create all kinds of targets by calibrating and exporting to *.vwf files.
Single screen targets are usually made for warping. Multi screen targets involve warping and blending.
Learn more here about VIOSO 6.
Assigning targets
Targets are assigned via drag & drop:
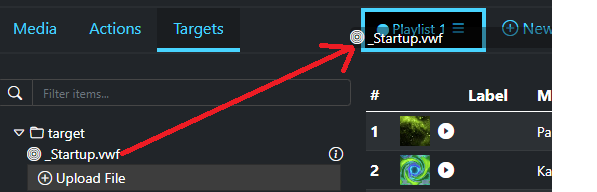
There are three levels, where targets are assigned:
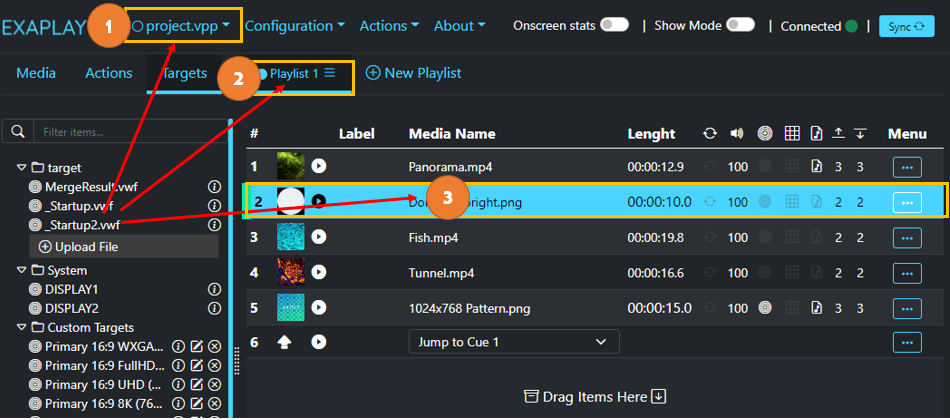
- Assign to project: Target is used for all playlist and their items
- Assign to playlist: Target is used for this playlist only. Other playlists use the project target
- Assign to item: Target is used for this item only. Other items use playlist target.
(4) Playlist
The Playlist represents a chronological series of media and action items. It is populated via drag & drop from the Left Pane. You can have multiple playlists in one project, but playback only one at a time.
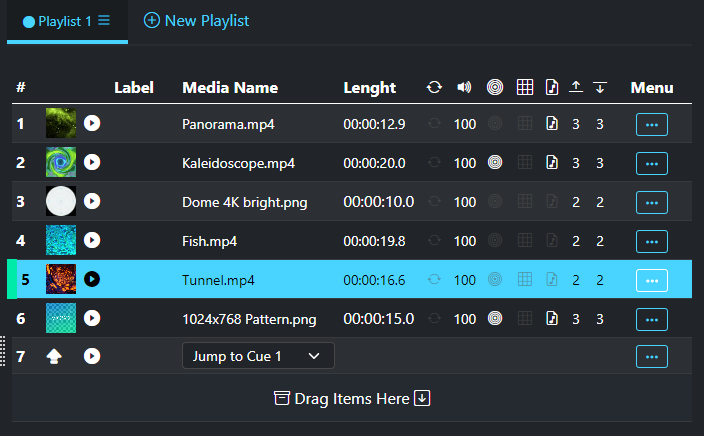
Each line represents a media item or action item and displays:
- Cue ID (#) – for addressing by the Jump To Cue action
- Thumbnail or icon
-
 Plays this item now, but follows the item’s fade settings
 - User defined label: double-click to add some characters and terminate with [Enter]
- Media Filename
- Length:
- videos display the legth of the video stream
- images are displayed 10 seconds. Double-click to change this time and terminate with [Enter]
-
 toggle seamless loop
 -
 set audio level (100% is maximum audio level). Double-click to change the audio level and terminate with [Enter]
 -
 indicates the target state. When greyed out, the Playlist’s target is used, otherwise it is overwritten. Use the Menu
  to remove a target from this item.
 -
 content mapping: not yet implemented (version 1.0.0)
 -
 indicates the audio handling:
- green (videos only): audio track from the video file is played
- white: an audio file from the Left Pane is assigned by drag & drop. Such audio file is played with the video or image. In case of a loop, audio loops independently from the video.
- grayed out: no audio
-
 Fade in time in seconds. Double-click to change the value and terminate with [Enter]
 -
 Fade out time in seconds. Double-click to change the value and terminate with [Enter]. Used only for Fade-To-Black, ignored by Crossfade
 -
Menu:
- Delete Target: removes the target assignment from this item. The Playlist’s target is used after that.
- Remove: removes this item from the playlist instantly.
- Properties:
- General: Basic media information, set the fade type and fade in/out times
- Target: Displays the target that is used for this item
- Audio: Displays the audio setting for this item
- Info: Extensive media information
(5) Playback Bar
The playback bar displays the current playback status of EXAPLAY.

- Name of Playlist
- Thumbnail and basic information of the media file that is currently played as well as its target
- Buttons: Play Previous item,Stop playback, Play/Pause, Play next item – all buttons follow the item’s fade setting
- Seeker bar: Displays the position in relation to the length of the current item
- Global audio level: indicates & influences the audio output level (in addition to individual cue-based audio level settings)