• Home
  • Knowledge Base
    • Licensing
    • Operation
    • Quality Improvement
    • References
  • Documentation
    • VIOSO Core 5
    • VIOSO Anyblend 5
    • VIOSO Anyblend VR&SIM 5
    • VIOSO Integrate 5
    • VIOSO Player 2
  • FAQ
    • Error and other feedback
    • Licensing
    • System & Requirements
  • Videos
  • Home
  • Knowledge Base
    • Licensing
    • Operation
    • Quality Improvement
    • References
  • Documentation
    • VIOSO Core 5
    • VIOSO Anyblend 5
    • VIOSO Anyblend VR&SIM 5
    • VIOSO Integrate 5
    • VIOSO Player 2
  • FAQ
    • Error and other feedback
    • Licensing
    • System & Requirements
  • Videos

EXAPLAY

home/Documentation/moved to docs.exaplay.one/EXAPLAY
Expand All Collapse All
  • EXAPLAY Overview
    • EXAPLAY Quickstart
    • EXAPLAY Main Window
    • EXAPLAY Settings
    • EXAPLAY Remote Control

EXAPLAY Quickstart

778 views 0

Emanuel
September 12, 2022

5 easy steps to turn your PC into a headless media server:

  1. We recommend using a professional NVIDIA GPU on your Windows system. Configure the system as outlined here.
  2. Download VIOSO 6 and retrieve a fee 30-day demo license. EXAPLAY is part of VIOSO 6. Install on your system and apply the demo license. Learn more about the licensing here. 
  3. Launch EXAPLAY using the Desktop Icon:

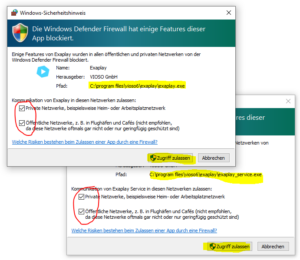
    At first startup, the Windows Firewall pops up twice. Allow “exaplay.exe” and “exaplay_service.exe” through the firewall on all networks:

    After that, you can start using EXAPLAY through the local browser. The standard URLs are:
    • http://localhost => EXAPLAY user interface
    • http://locahost:81 => EXAPLAY Service user interface


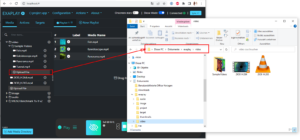
  4. First use of EXAPLAY with sample content
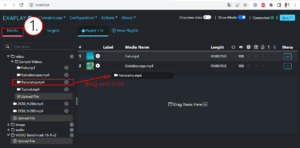
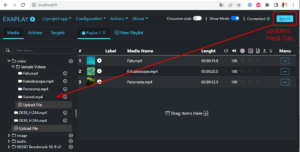
    1. Drag sample files from the Media Tag into the playlist
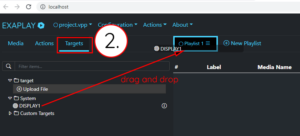
    2. Select a target: this is the place on the screen(s), where EXAPLAY outputs the playback. Targets can be entire displays (“system target”), parts of displays (“custom targets”) or calibration files from VIOSO 6 software (*.vwf). “DISPLAY1” will create a fullscreen output on that screen. “Primary 16:9 FullHD (1920×1080)” will draw a rectangle of this size on the primary display and output there.
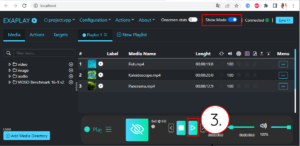
    3. Start the Playback.
      Hint: Double-clicking on a fullscreen output turns it into a movable window. So you can access the user interface and stop the output by toggling the button “Show Mode”


  5. Use your own content.

    1. By uploading to the PC running EXAPLAY.
      As default, uploaded media files are stored in the subfolder /Exaplay of the current user’s Document folder:
    2. By browsing local folders
      Make new local folders accessible in the media tab by clicking “Add Media Directory”:

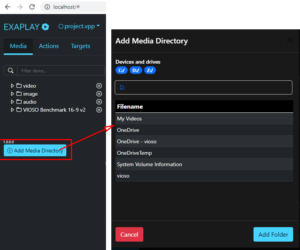
      After each action, click “Sync” to update the Media Tab with the local file system.


Done! With these 5 steps you have experienced the main usage of EXAPLAY. Continue reading about all details of the user interface or the settings of EXAPLAY or just have fun exporing everything on your own.

Was this helpful?

Yes  No
Related Articles
  • EXAPLAY Overview
  • EXAPLAY Main Window
  • EXAPLAY Settings
  • EXAPLAY Remote Control

Didn't find your answer? Contact Us

Previous
EXAPLAY Overview
Next
EXAPLAY Main Window
  • Ticket System
  • VIOSO Home
  • Imprint
  • © 2020-now VIOSO GmbH. All Rights Reserved.

We use cookies on our website to give you the most relevant experience by remembering your preferences and repeat visits. By clicking “Accept”, you consent to the use of ALL the cookies.
Do not sell my personal information.
Cookie settingsACCEPT
Manage consent

Privacy Overview

This website uses cookies to improve your experience while you navigate through the website. Out of these, the cookies that are categorized as necessary are stored on your browser as they are essential for the working of basic functionalities of the website. We also use third-party cookies that help us analyze and understand how you use this website. These cookies will be stored in your browser only with your consent. You also have the option to opt-out of these cookies. But opting out of some of these cookies may affect your browsing experience.
Necessary
Always Enabled
Necessary cookies are absolutely essential for the website to function properly. This category only includes cookies that ensures basic functionalities and security features of the website. These cookies do not store any personal information.
Non-necessary
Any cookies that may not be particularly necessary for the website to function and is used specifically to collect user personal data via analytics, ads, other embedded contents are termed as non-necessary cookies. It is mandatory to procure user consent prior to running these cookies on your website.
SAVE & ACCEPT