• Home
  • Knowledge Base
    • Licensing
    • Operation
    • Quality Improvement
    • References
  • Documentation
    • VIOSO Core 5
    • VIOSO Anyblend 5
    • VIOSO Anyblend VR&SIM 5
    • VIOSO Integrate 5
    • VIOSO Player 2
  • FAQ
    • Error and other feedback
    • Licensing
    • System & Requirements
  • Videos
  • Home
  • Knowledge Base
    • Licensing
    • Operation
    • Quality Improvement
    • References
  • Documentation
    • VIOSO Core 5
    • VIOSO Anyblend 5
    • VIOSO Anyblend VR&SIM 5
    • VIOSO Integrate 5
    • VIOSO Player 2
  • FAQ
    • Error and other feedback
    • Licensing
    • System & Requirements
  • Videos

VIOSO Anyblend 5

home/Documentation/VIOSO Anyblend 5
Expand All Collapse All
  • VIOSO Anyblend Software Overview
  • Video Tutorial: Typical Projector Setup
  • VIOSO Anyblend vs. VIOSO Anyblend VR&SIM
  • System requirements and specifications
    • GPU setup
      • GPU drivers for Anyblend
      • Configuring an NVIDIA Quadro GPU-based system
    • VIOSO Anyblend download and installation
  • System preparation
    • EDID management
    • GPU Display Spanning
  • VIOSO Anyblend main window explained
  • Calibration (single client)
    • New calibration
    • Edit calibration
    • 1-click Recalibration
  • Embedding Calibrations in Windows
    • NVAPI vs. Windows Aero
    • Windows Aero (Windows 7 only)
  • Global program configuration
    • Configuration files and location
    • Autostart
  • Remote Control of Anyblend

Embedding Calibrations in Windows

758 views 0

Emanuel
March 10, 2020

Select the display compound you would like to use for your project.

Choose the hooking mode that you would like to use (if an option is crossed out, you will not be able to use it for hooking).

The preferred hooking method:

Hardware-based hooking: On this level, the warping and blending data is imported directly into the graphics processing unit (GPU). This hooking mode requires you to use a professional series of graphics cards.

There are other hooking methods, however, we recommend to utilize hardware-based hooking whenever possible. To know more about other calibration hooking methods, please refer to the GPU Knowledge base section.

Select the hooking mode and press ‘Load’.

For each selected hooking mode in VIOSO Anyblend, there are some adjustments that can be made. These options can be adjusted in the “initial hook options dialog”, which automatically appears every time a calibration is loaded or you can bring it up by clicking the ‘Options’ button on the main window.

The parameters that you can adjust will change slightly from one hooking mode to another.

Table of Contents

  • NVIDIA hooking options
    • Display size
    • Display region
    • Advanced
  • Hooking process
  • Display (re-)activation and arrangement

NVIDIA hooking options

If you are hooking the calibration on NVIDIA Quadro GPU using NVAPI, here is what you can adjust:
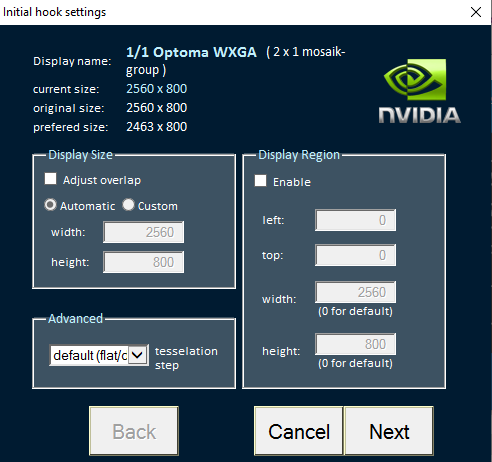
Display size

Configure the region of interest (ROI) from the source (e.g. the part of the Windows desktop to be used for the warping and blending). At the top of the window, you will find the display name, the current size of your display, and the original size of your display.

  • Adjust overlap
    Check this box to adjust the overlap of the projector. Whether it is an automatic configuration (preferred size) or a custom one.
  • Display size
    Check this box if using NVIDIA Quadro K/M 5000/6000 to get a Windows desktop resolution without overlap. This greatly increases the visual quality.
  • Advanced
    Tessellation step: preciseness of the warping; applicable for NVIDIA Quadro.

Display region

Configure the region of interest (ROI) from the source (e.g. the part of the Windows desktop to be used for the warping and blending).

Advanced

  • Force screen update- Check if parts of the displays are not automatically updated.
  • Show system cursor- Display an original system cursor.
  • Don’t show warped cursor- Turns off the warped cursor.

Click ‘Next’.

Hooking process

This process might take a while. Wait until the projectors and screen stop loading (flickering).

Anyblend has hooked your desktop onto your calibration.

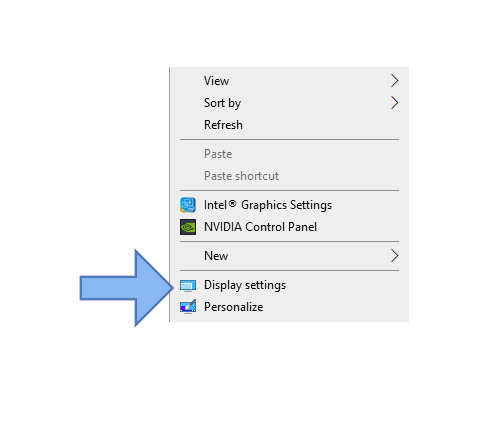
If you are using a screen(s) for operation, it may not be showing anything and appear to be turned off.

Right click on your screen and click on the ‘Display settings’

Display (re-)activation and arrangement

After the hooking is activated, sometimes you will notice that your operating screen has been disconnected. Click on the screen that you would like to get back.

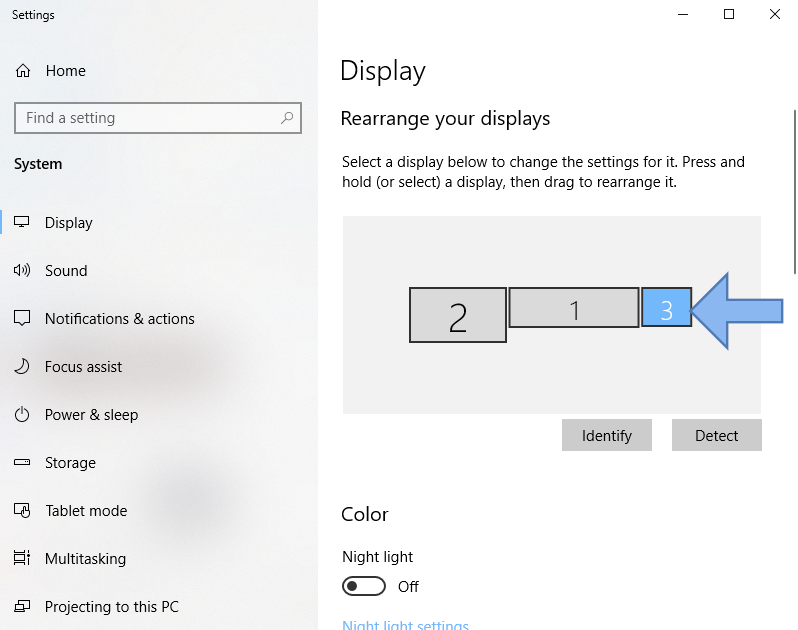
Go down the “Display settings” window–you will see that the screen has been disconnected. Click and a menu will roll down.

Select ‘Extend desktop to this display’.

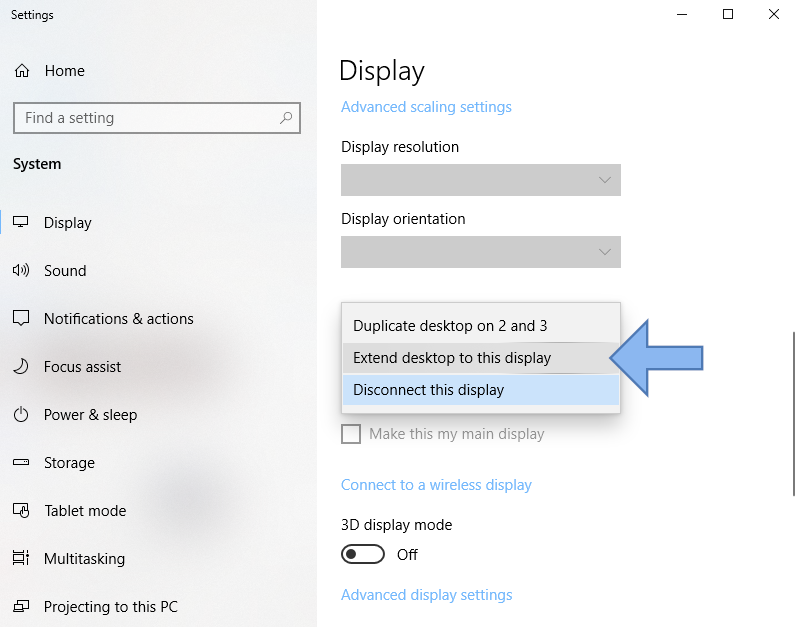
A dialog will pop up on your screen. You will have 15 seconds to either keep the new settings or revert back.

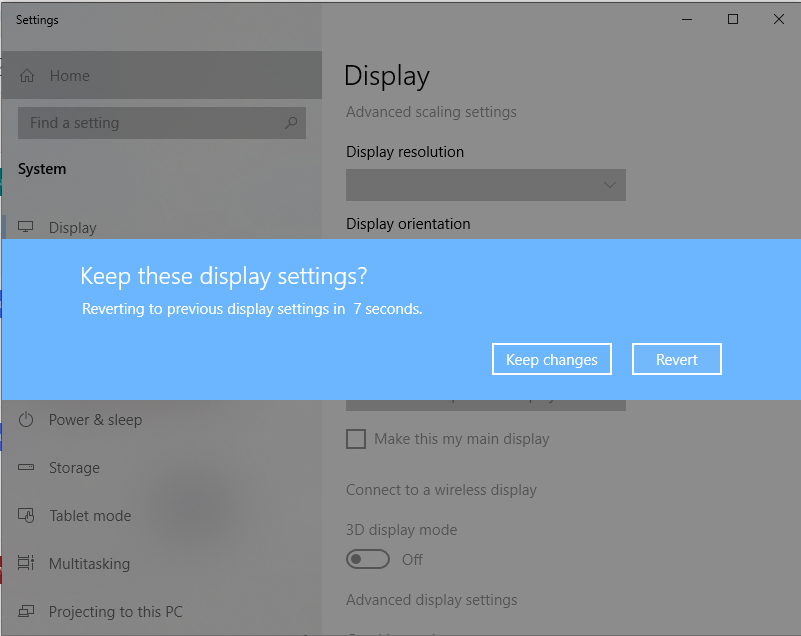
Select ‘Keep changes’.

After you have selected the screen you would like to make your main display, check the box “Make this my main display”.

Your screen may also have switched places.

Click and drag the screen you want to rearrange and drag it to the correct location.

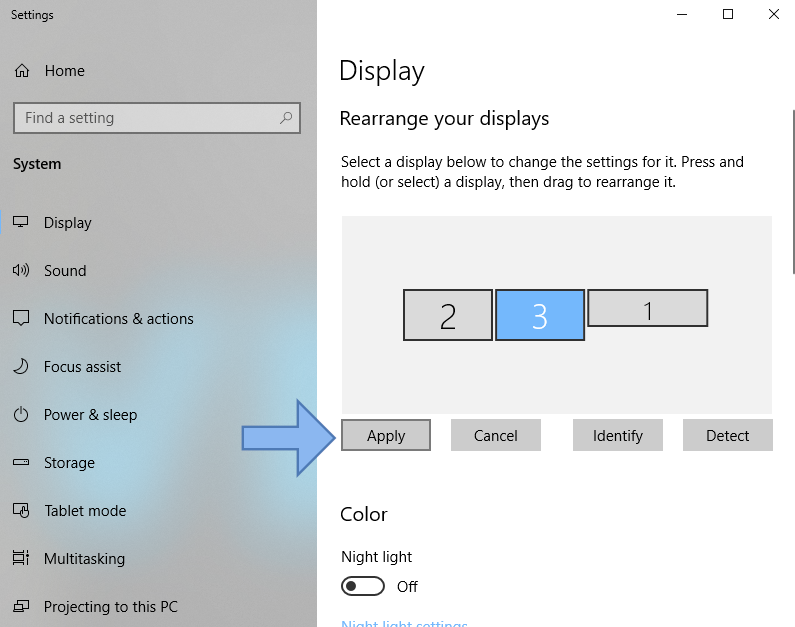
Click ‘Apply’ and close the window.

Was this helpful?

Yes  No
Related Articles
  • GPU drivers for Anyblend
  • NVAPI vs. Windows Aero
  • New calibration
  • GPU setup
  • Configuring an NVIDIA Quadro GPU-based system
  • Windows Aero (Windows 7 only)

Didn't find your answer? Contact Us

Previous
1-click Recalibration
Next
NVAPI vs. Windows Aero
  • Ticket System
  • VIOSO Home
  • Imprint
  • © 2020-now VIOSO GmbH. All Rights Reserved.

We use cookies on our website to give you the most relevant experience by remembering your preferences and repeat visits. By clicking “Accept”, you consent to the use of ALL the cookies.
Do not sell my personal information.
Cookie settingsACCEPT
Manage consent

Privacy Overview

This website uses cookies to improve your experience while you navigate through the website. Out of these, the cookies that are categorized as necessary are stored on your browser as they are essential for the working of basic functionalities of the website. We also use third-party cookies that help us analyze and understand how you use this website. These cookies will be stored in your browser only with your consent. You also have the option to opt-out of these cookies. But opting out of some of these cookies may affect your browsing experience.
Necessary
Always Enabled
Necessary cookies are absolutely essential for the website to function properly. This category only includes cookies that ensures basic functionalities and security features of the website. These cookies do not store any personal information.
Non-necessary
Any cookies that may not be particularly necessary for the website to function and is used specifically to collect user personal data via analytics, ads, other embedded contents are termed as non-necessary cookies. It is mandatory to procure user consent prior to running these cookies on your website.
SAVE & ACCEPT