• Home
  • Knowledge Base
    • Licensing
    • Operation
    • Quality Improvement
    • References
  • Documentation
    • VIOSO Core 5
    • VIOSO Anyblend 5
    • VIOSO Anyblend VR&SIM 5
    • VIOSO Integrate 5
    • VIOSO Player 2
  • FAQ
    • Error and other feedback
    • Licensing
    • System & Requirements
  • Videos
  • Home
  • Knowledge Base
    • Licensing
    • Operation
    • Quality Improvement
    • References
  • Documentation
    • VIOSO Core 5
    • VIOSO Anyblend 5
    • VIOSO Anyblend VR&SIM 5
    • VIOSO Integrate 5
    • VIOSO Player 2
  • FAQ
    • Error and other feedback
    • Licensing
    • System & Requirements
  • Videos

VIOSO 6

home/Documentation/moved to docs.vioso.com/VIOSO 6
Expand All Collapse All
  • VIOSO 6 Overview
  • System requirements for VIOSO 6
  • Modes of operation
  • Free Mode Configuration
  • Project Mode Configuration
    • Project Creation
    • Project Designer
  • Calibration Procedure
    • Camera Adjustment
    • Projector Masks
    • Scan Settings
    • Scan and Result Inspection
      • Advanced scan optimization
    • Multicamera Calibration (SIM-Feature)
  • 3D Mapping
  • Edit a calibration
    • Blend adjustment
    • Projector adjustment
    • Working with Masks
  • Using the calibration
    • Integrated Player for videos and images
    • Export to EXAPLAY
    • Desktop Hooking (Anyblend Technology)
    • 3rd Party Applications
      • Auto-Export in Project Mode
      • Manual Export in Quick Mode
  • Recalibration
    • Recalibration in Project mode
    • Recalibration in Quick Mode

Camera Adjustment

1227 views 0

Emanuel
August 18, 2022

One feature of this window is the camera view screen. The goal is to make sure that the image resembles reality as much as possible.
(The green bar at the bottom of the window is not a loading bar. It is a progress bar for the calibration as a whole)

It is important that the camera is placed in a way that allows it to capture all or most of your projection surface.

Tip: When possible, have your camera placed directly in front of your projection surface.

Select the type of video file your camera is recording. This depends on the camera you are using and your setup.

Table of Contents

    • Camera options
  • Drawing a Region of interest (ROI)
    • Masking Tools
    • Region of interest mask
    • Why is this step important?
    • Is it important to do this every time I do a calibration?

Camera options

If you would like to improve the quality of the picture on screen, click on the ‘Options’ button. A dialog with the settings of your camera will appear. You can modify the settings there until the image on screen is acceptable and as close to reality as possible. Try to change the parameters for exposure, brightness, etc.

Check all tabs to make sure that all of the automatic features of the camera are unmarked (OFF).

If you have a VIOSO Calibration kit (IDS camera), click here for a more detailed explanation.

UNmark all auto features
Real picture
Camera view

Once you are satisfied with the result, click ‘Ok’.

Drawing a Region of interest (ROI)

Another feature in this window is to designate a region of interest.

Masking Tools

Region of interest mask

With the help of the masking tools, create a region of interest mask by selecting the desired scan area (your projection surface).

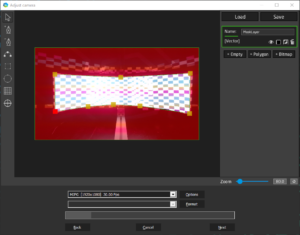
Once you have selected the area of your projection, take the bucket tool and use it OUTSIDE the region of interest.

The colors on the camera view will change to look something like this:

  • Save mask button- Click here once you are satisfied with the mask you have created. It’s recommended to save your mask, especially if you have a fixed setup as you can load a mask instead of re-creating one. The mask will be saved as an image file.
  • Load mask button- If  you already have mask saved, click here to upload your mask file.

Always verify that your mask fits your projection area. If the projectors or camera have been moved, the mask might not fit anymore.

Why is this step important?

When you are working in less than perfect ambient conditions. For example: lights, reflections, or if there is something in the camera view that will disturb the scan. By masking the Region Of Interest (ROI), the scan will be more efficient and precise.

Make sure you select the area where you want to project–leaving disturbances outside the mask. This step is not an exercise in precision.

Example:

By excluding the spaces where we may have ambient disturbances that cannot be avoided (if you are able to move the source of light, we recommend doing so), it will make it easier for the system to concentrate on the area you want to focus (your projection surface).

Is it important to do this every time I do a calibration?

It is not crucial if there are no light disturbances and the ambient conditions are optimal, but it is recommended as the scan will be more effective and precise.

If you have a fixed setup, you should save the mask once you have created it. Doing this will save you time when creating a new calibration.

without ROI mask
with ROI mask

Click ‘Next’.


Click here to proceed to the next section.


Tags:calibrationscanningvioso6

Was this helpful?

Yes  No
Related Articles
  • Projector Masks
  • Recalibration in Project mode
  • Auto-Export in Project Mode
  • Integrated Player for videos and images
  • Advanced scan optimization
  • Scan Settings

Didn't find your answer? Contact Us

Previous
Calibration Procedure
Next
Projector Masks
  • Ticket System
  • VIOSO Home
  • Imprint
  • © 2020-now VIOSO GmbH. All Rights Reserved.

We use cookies on our website to give you the most relevant experience by remembering your preferences and repeat visits. By clicking “Accept”, you consent to the use of ALL the cookies.
Do not sell my personal information.
Cookie settingsACCEPT
Manage consent

Privacy Overview

This website uses cookies to improve your experience while you navigate through the website. Out of these, the cookies that are categorized as necessary are stored on your browser as they are essential for the working of basic functionalities of the website. We also use third-party cookies that help us analyze and understand how you use this website. These cookies will be stored in your browser only with your consent. You also have the option to opt-out of these cookies. But opting out of some of these cookies may affect your browsing experience.
Necessary
Always Enabled
Necessary cookies are absolutely essential for the website to function properly. This category only includes cookies that ensures basic functionalities and security features of the website. These cookies do not store any personal information.
Non-necessary
Any cookies that may not be particularly necessary for the website to function and is used specifically to collect user personal data via analytics, ads, other embedded contents are termed as non-necessary cookies. It is mandatory to procure user consent prior to running these cookies on your website.
SAVE & ACCEPT