• Home
  • Knowledge Base
    • Licensing
    • Operation
    • Quality Improvement
    • References
  • Documentation
    • VIOSO Core 5
    • VIOSO Anyblend 5
    • VIOSO Anyblend VR&SIM 5
    • VIOSO Integrate 5
    • VIOSO Player 2
  • FAQ
    • Error and other feedback
    • Licensing
    • System & Requirements
  • Videos
  • Home
  • Knowledge Base
    • Licensing
    • Operation
    • Quality Improvement
    • References
  • Documentation
    • VIOSO Core 5
    • VIOSO Anyblend 5
    • VIOSO Anyblend VR&SIM 5
    • VIOSO Integrate 5
    • VIOSO Player 2
  • FAQ
    • Error and other feedback
    • Licensing
    • System & Requirements
  • Videos

VIOSO Core 5

home/Documentation/VIOSO Core 5
Expand All Collapse All
  • VIOSO Core Software Overview
  • Video tutorial: Demonstrating a full calibration procedure
  • VIOSO Core System requirements
  • System preparation
    • GPU setup
    • VNC setup/Remote setup
    • Projector setup/ alignment
    • Camera setup
      • VIOSO Calibration Kit v4 (Daheng - from 2023)
      • VIOSO Calibration Kit v3 (HiK - from 2021)
      • VIOSO Calibration Kit v1&2 (IDS camera - legacy)
    • Prepare screen and testpattern
    • Configure VIOSO Anyblend to run as Master or Client
  • VIOSO Core main window explained
  • Calibration
    • Pre-Scan configuration
      • Display split
    • Camera settings / ROI
    • Projector masking
    • Scanning procedure
      • Pre-Scan: Brightness inspector
      • Pre-Scan: Dot Inspector
      • Pre-Scan: Noise Filter (optional)
      • Scan
      • Post-Scan: Geometric scan inspection
        • Geometry scan adjustments
      • Scan finished
    • Content Mapping and Warping
    • Save and finish
  • Adjustments and Optimizations
    • Projection masking
    • Warping
  • Export calibration
  • Automatic Recalibration

Projector masking

1348 views 2

Emanuel
March 17, 2020

This step will only come up if you have checked the ‘Set display calibration mask’ box on the Display arrangement window.

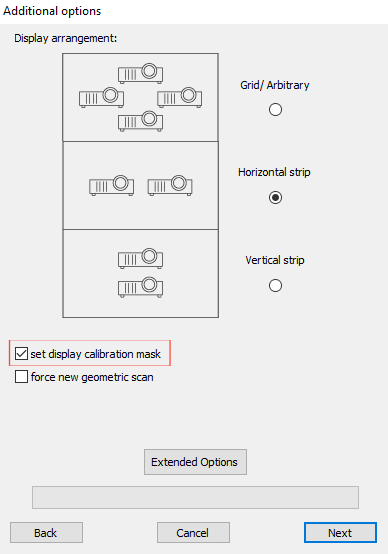
If you didn’t check this box, continue on to the next section. At the end of the calibration process, you will be able to load or create projector masks.

See here a video how to handle projector masking:

After setting the region of interest, the ‘Set projection mask’ window will appear.

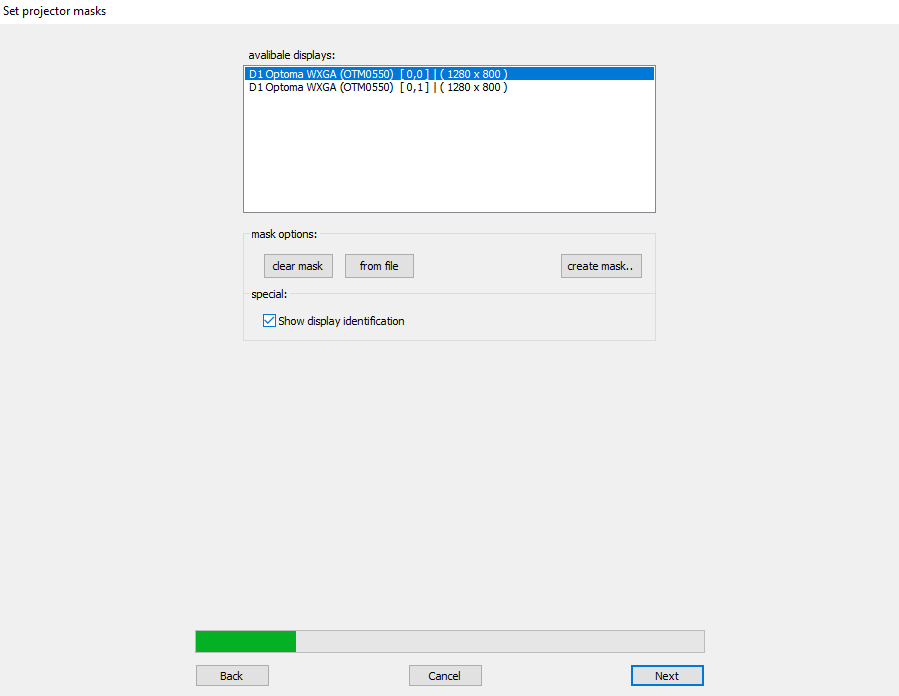
In this window, you will create individual masks for projectors–one projector at a time.

Select the projector you want to create a mask for by clicking its name–the selected projector will be marked in blue.

The mask options in this window are as follows:

  • Create a mask- Create a new mask.
  • Clear a mask- Remove a mask.
  • From file-  Load a mask that you have saved on your disk.
  • Show display identification (check box)- Display the tag name of the projector on screen, so you can identify the projector you are currently working on.

On your projection surface, a similar tag will appear (with the name of the projector you are using). Example:

Creating projector masks

Click on ‘Create mask’.

The “create individual display mask” window will pop up, to create a mask for the selected projector on the fly.

The window consists of the tool section, white areas (visible areas), and black areas (masked areas that won’t be visible).

The masking tools are operated by both mouse and/or keyboard.

Note: You can also create masks by a third-party tool such as Photoshop, paint, etc. in a 24 bit Bitmap format and then load them on to the calibration.

For more information on masking and a full explanation on the masking tools, refer to the Projection masking section.

unmasked projector
masked projector

Click here to proceed to the next section.

Was this helpful?

2 Yes  No
Related Articles
  • Geometry scan adjustments
  • Display split
  • Projection masking
  • Pre-Scan: Brightness inspector
  • Pre-Scan configuration
  • GPU setup

Didn't find your answer? Contact Us

Previous
Camera settings / ROI
Next
Scanning procedure
  • Ticket System
  • VIOSO Home
  • Imprint
  • © 2020-now VIOSO GmbH. All Rights Reserved.

We use cookies on our website to give you the most relevant experience by remembering your preferences and repeat visits. By clicking “Accept”, you consent to the use of ALL the cookies.
Do not sell my personal information.
Cookie settingsACCEPT
Manage consent

Privacy Overview

This website uses cookies to improve your experience while you navigate through the website. Out of these, the cookies that are categorized as necessary are stored on your browser as they are essential for the working of basic functionalities of the website. We also use third-party cookies that help us analyze and understand how you use this website. These cookies will be stored in your browser only with your consent. You also have the option to opt-out of these cookies. But opting out of some of these cookies may affect your browsing experience.
Necessary
Always Enabled
Necessary cookies are absolutely essential for the website to function properly. This category only includes cookies that ensures basic functionalities and security features of the website. These cookies do not store any personal information.
Non-necessary
Any cookies that may not be particularly necessary for the website to function and is used specifically to collect user personal data via analytics, ads, other embedded contents are termed as non-necessary cookies. It is mandatory to procure user consent prior to running these cookies on your website.
SAVE & ACCEPT