• Home
  • Knowledge Base
    • Licensing
    • Operation
    • Quality Improvement
    • References
  • Documentation
    • VIOSO Core 5
    • VIOSO Anyblend 5
    • VIOSO Anyblend VR&SIM 5
    • VIOSO Integrate 5
    • VIOSO Player 2
  • FAQ
    • Error and other feedback
    • Licensing
    • System & Requirements
  • Videos
  • Home
  • Knowledge Base
    • Licensing
    • Operation
    • Quality Improvement
    • References
  • Documentation
    • VIOSO Core 5
    • VIOSO Anyblend 5
    • VIOSO Anyblend VR&SIM 5
    • VIOSO Integrate 5
    • VIOSO Player 2
  • FAQ
    • Error and other feedback
    • Licensing
    • System & Requirements
  • Videos

VIOSO Integrate 5

home/Documentation/VIOSO Integrate 5
Expand All Collapse All
  • VIOSO Integrate Overview
  • VIOSO Integrate VS Integrate Plus
  • Media Playback Solutions
    • AV Stumpfl Pixera
      • Running Pixera Autocal standalone
      • UV-Mapping and 3D calibration
      • Multi-client setups
    • Vertex VIOSO & IOVERSAL Vertex
      • AutoCal Single Camera: Getting started
      • Modifying, Optimizing and Recalibration
      • Using Autocal Standalone
  • Dome- and Planetarium Solutions
  • 3D Engines
    • Unity Plugin
    • Unreal Engine Integration
      • Examples: UE4.24-.26
      • Examples: UE4.27 & UE5
    • MiddleVR Integration
    • Techviz
  • Simulators
    • SILAB
    • Quantum 3D: Mantis
    • AVSimulation: SCANeR Studio
    • rFpro
    • Prepar3D
    • X-Plane 11
  • Projector Integration
    • Barco Pulse Export
    • Norxe Export
  • VIOSO WarpBlend API
    • API usage on Windows
    • API usage on Linux
    • Implementation Remarks
    • VIOSOWarpBlend.ini Reference
    • API Examples
      • Example 1 - Simulator with moving platform
      • Example 2 - Another simulator with moving platform
      • Example 3 – Cave
      • Example 4 – Video player

Using Autocal Standalone

536 views 0

Emanuel
February 17, 2021

The built-in calibration was made with the intention to faciliate handling multiple projectors as much as possible. However, there are situations where more detailled interaction with the calibration tool and more features and parameters are required. For this cases, Autocal can be launched standalone and offers the same feature-rich user interface as our other calibration tools.

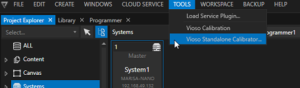
Start the Autocal in standalone mode by going in tools menu and selecting “Vioso Standalone Calibrator”:

Autocal (or Autocal Plus depending your license) will start up, and you will be able to perform a calibration. Please refer to VIOSO Core helpdesk to see how to calibrate : /documentation/core-software-overview/

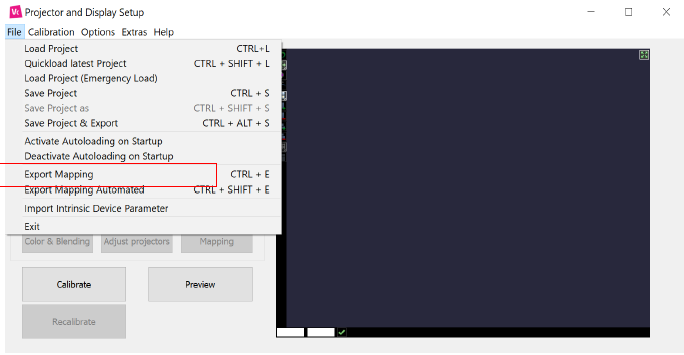
Once calibration is done and you have a compound to export, go to File / Export Mapping :


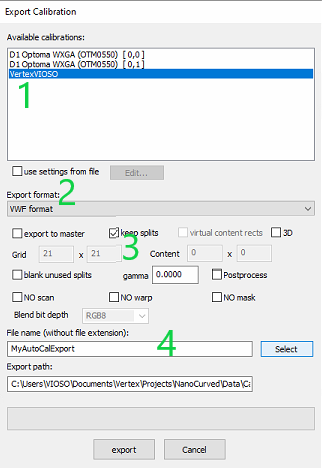
1.Select the compound you want to export
2.Choose VWF file as export format
3.Tick the “Keep splits” checkbox
4.Give a name to your file and select the folder where you want to save it

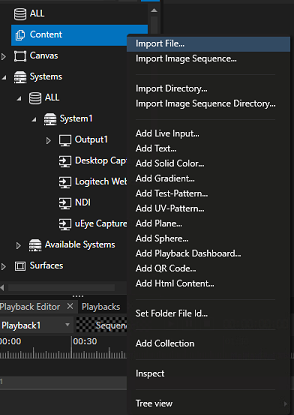
Back to VERTEX VIOSO, load your calibration file by choosing “Import file” after a right click on “Content” :

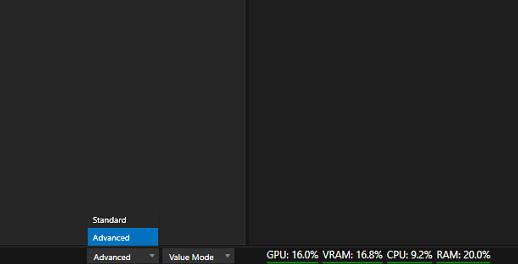
Make sure that you have set Vertex in “Advanced mode” in order to have access to surfaces Warp&Blend files settings :

You can see now in your explorer a VIOSO calibration files with separated Warp Files and Blend Files :

You will need now to apply these files to your surfaces :
1. Select “Surfaces” in the explorer
2. Select “Surface1”
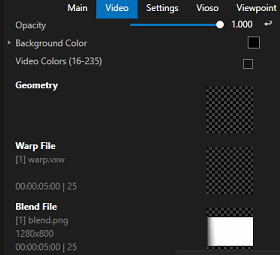
3.Select “Video” in the inspector
4.Find the areas where you should drag and drop Warp&Blend files

Drag and drop your Warp & Blend files in dedicated areas from the inspector, it will look like this once done :

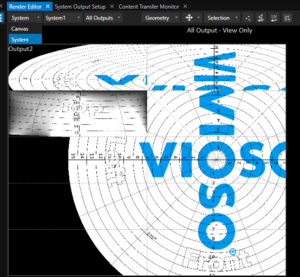
You can doublecheck that your warp and blend files are correctly applied by switching the view in the render editor from “Canvas” to “System” :

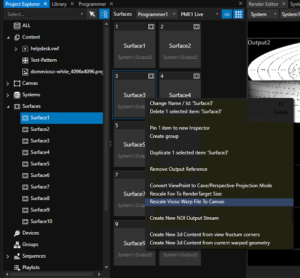
Final step is to rescale the warp file to the canvas in order to relocate correctly your surface on the canvas. To do so right click on a Surface with VIOSO Warp&Blend files applied and select “rescale VIOSO Warp file to canvas” :

Repeat these steps for all your surfaces and now, your VIOSO Calibration is applied to your project and you can playback full screen your content !

Was this helpful?

Yes  1 No
Related Articles
  • Barco Pulse Export
  • Examples: UE4.24-.26
  • SILAB
  • Quantum 3D: Mantis
  • VIOSO Integrate Overview
  • Norxe Export

Didn't find your answer? Contact Us

Previous
Modifying, Optimizing and Recalibration
Next
Dome- and Planetarium Solutions
  • Ticket System
  • VIOSO Home
  • Imprint
  • © 2020-now VIOSO GmbH. All Rights Reserved.

We use cookies on our website to give you the most relevant experience by remembering your preferences and repeat visits. By clicking “Accept”, you consent to the use of ALL the cookies.
Do not sell my personal information.
Cookie settingsACCEPT
Manage consent

Privacy Overview

This website uses cookies to improve your experience while you navigate through the website. Out of these, the cookies that are categorized as necessary are stored on your browser as they are essential for the working of basic functionalities of the website. We also use third-party cookies that help us analyze and understand how you use this website. These cookies will be stored in your browser only with your consent. You also have the option to opt-out of these cookies. But opting out of some of these cookies may affect your browsing experience.
Necessary
Always Enabled
Necessary cookies are absolutely essential for the website to function properly. This category only includes cookies that ensures basic functionalities and security features of the website. These cookies do not store any personal information.
Non-necessary
Any cookies that may not be particularly necessary for the website to function and is used specifically to collect user personal data via analytics, ads, other embedded contents are termed as non-necessary cookies. It is mandatory to procure user consent prior to running these cookies on your website.
SAVE & ACCEPT