• Home
  • Knowledge Base
    • Licensing
    • Operation
    • Quality Improvement
    • References
  • Documentation
    • VIOSO Core 5
    • VIOSO Anyblend 5
    • VIOSO Anyblend VR&SIM 5
    • VIOSO Integrate 5
    • VIOSO Player 2
  • FAQ
    • Error and other feedback
    • Licensing
    • System & Requirements
  • Videos
  • Home
  • Knowledge Base
    • Licensing
    • Operation
    • Quality Improvement
    • References
  • Documentation
    • VIOSO Core 5
    • VIOSO Anyblend 5
    • VIOSO Anyblend VR&SIM 5
    • VIOSO Integrate 5
    • VIOSO Player 2
  • FAQ
    • Error and other feedback
    • Licensing
    • System & Requirements
  • Videos

VIOSO Core 5

home/Documentation/VIOSO Core 5
Expand All Collapse All
  • VIOSO Core Software Overview
  • Video tutorial: Demonstrating a full calibration procedure
  • VIOSO Core System requirements
  • System preparation
    • GPU setup
    • VNC setup/Remote setup
    • Projector setup/ alignment
    • Camera setup
      • VIOSO Calibration Kit v4 (Daheng - from 2023)
      • VIOSO Calibration Kit v3 (HiK - from 2021)
      • VIOSO Calibration Kit v1&2 (IDS camera - legacy)
    • Prepare screen and testpattern
    • Configure VIOSO Anyblend to run as Master or Client
  • VIOSO Core main window explained
  • Calibration
    • Pre-Scan configuration
      • Display split
    • Camera settings / ROI
    • Projector masking
    • Scanning procedure
      • Pre-Scan: Brightness inspector
      • Pre-Scan: Dot Inspector
      • Pre-Scan: Noise Filter (optional)
      • Scan
      • Post-Scan: Geometric scan inspection
        • Geometry scan adjustments
      • Scan finished
    • Content Mapping and Warping
    • Save and finish
  • Adjustments and Optimizations
    • Projection masking
    • Warping
  • Export calibration
  • Automatic Recalibration

Projection masking

1820 views 1

Emanuel
March 16, 2020

A mask is made to block an area from the projection so that nothing will be projected in the spot where the mask is placed.

Table of Contents

  • Video tutorial
  • Masking tools
      • General keyboard interaction:
      • General mouse interaction:
      • General considerations:
  • Mask for a single projector
  • Mask for an entire display (all projectors)

Video tutorial

Masking tools

Masks are useful in the case of overshooting or projection disturbances that cannot be avoided manually.

There are various ways to create a projection mask either by a third-party tool as a 24 bit Bitmap file (e.g. Adobe Photoshop) or created on-the-fly using the Mask tools.

A projection mask can be made in two ways:

  • Masking a single projector (one projector at a time).
  • Masking the whole calibration (all projectors).

Create a mask window:

Full screen / reset (ENTER)-
Switch between full screen and normal display mode.
Undo (CTRL +Z)-
Undo latest action.
Add shape (CTRL +INSERT)-
Add mask shape.
Delete shape (CTRL+DELETE)-
Delete mask shape.
Invert (CTRL+ PAGE UP)-
Invert shape.
Add Point (INSERT)-
Add point between the selected point (selected point is purple, unselected points are green).
Delete Point (DELETE)-
Deletes the selected point (purple).
Toggle Corner (PAGE+UP)-
Makes the edges round instead of straight on both sides of the selected point.
Save as Image file (CTRL+SHIFT+S)-
Saves an image file of the mask (*.bmp).
Save as XML file (CTRL+S)-
Saves an .xml file of the mask.
Load from XML file (CTRL+L)-
Load .xml file.
Apply end exit tool (STRG+ENT)-
Green check mark will apply the mask to your projector. The red X closes the window and erases the mask(s) that are not applied.

General keyboard interaction:

Tab Next point
Shift + Tab Previous point
Ctrl + Tab Next shape
Ctrl + Shift +Tab Previous Form
Arrow Keys Move selected point (fine steps)
Shift + Arrow keys Move selected point (coarse steps)
Ctrl + Arrow keys move shape (fine steps)
Ctrl + Shift + Arrow Keys move shape (coarse steps)

General mouse interaction:

  • Click on a point to select and move it using the LEFT button on the mouse.
  • Click within a shape to select and move it using the LEFT button on the mouse.

General considerations:

  • The order of shapes can’t be changed. High-numbered shapes will always overlay shapes with lower numbers.
  • Try to keep the number of shapes low–each shape consumes noticeable CPU power.


Mask for a single projector

  • Adjust projectors- Click here to make a mask one projector at a time, once a calibration project is loaded.

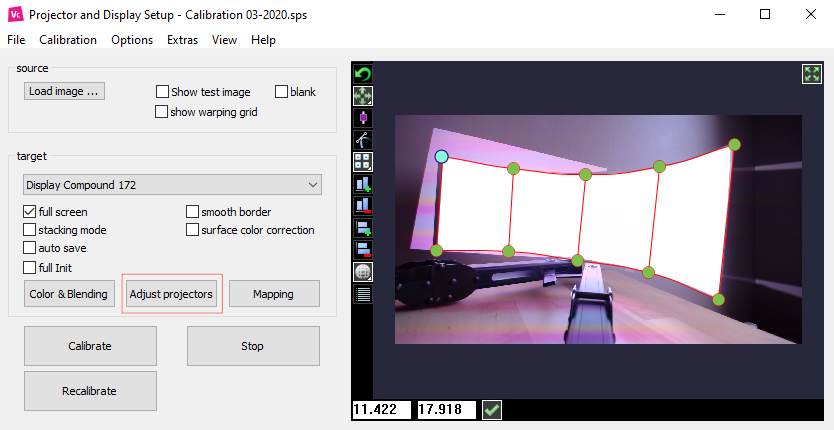
The individual display adjustment window will appear.

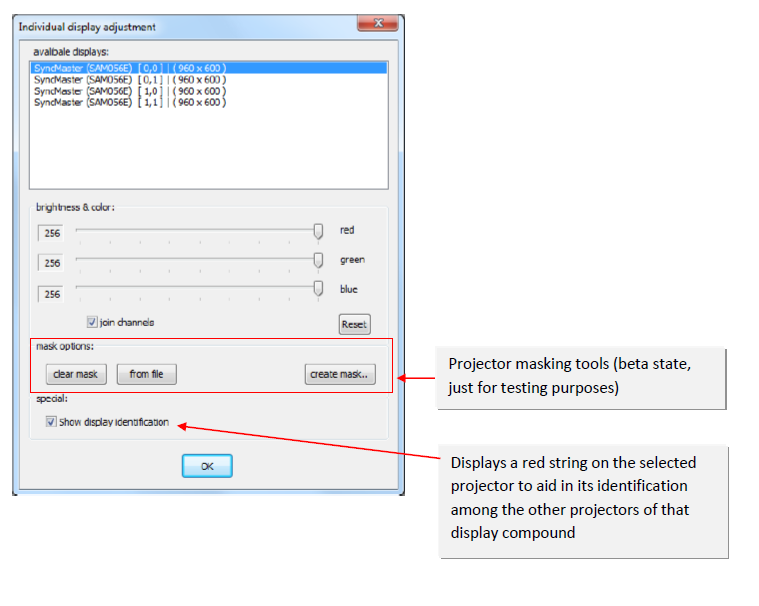
The mask options on this window are as follows:

  • Clear a mask- Remove a mask.
  • From file- Load a mask that you have saved on your disk.
  • New/edit mask- Create a new mask or edit a loaded mask.


Mask for an entire display (all projectors)

  • Color and blending- Click here to make a mask on all projections (whole projection), once a calibration project is loaded.

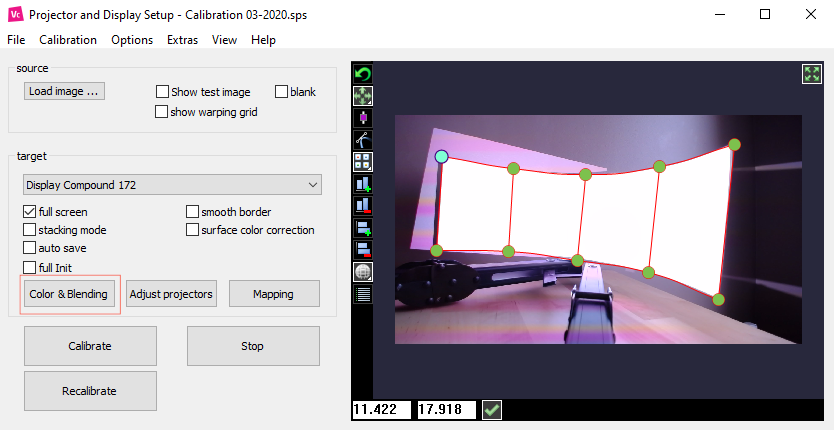
The adjust color and blending window will appear.


Buttons under content mask options:

  • Clear a mask- Remove a mask.
  • From file- Load a mask that you have saved on your disk.
  • New/edit mask- Create a new mask or edit a loaded mask.


Was this helpful?

1 Yes  1 No
Related Articles
  • Geometry scan adjustments
  • Display split
  • Pre-Scan: Brightness inspector
  • Pre-Scan configuration
  • GPU setup
  • Warping

Didn't find your answer? Contact Us

Previous
Adjustments and Optimizations
Next
Warping
  • Ticket System
  • VIOSO Home
  • Imprint
  • © 2020-now VIOSO GmbH. All Rights Reserved.

We use cookies on our website to give you the most relevant experience by remembering your preferences and repeat visits. By clicking “Accept”, you consent to the use of ALL the cookies.
Do not sell my personal information.
Cookie settingsACCEPT
Manage consent

Privacy Overview

This website uses cookies to improve your experience while you navigate through the website. Out of these, the cookies that are categorized as necessary are stored on your browser as they are essential for the working of basic functionalities of the website. We also use third-party cookies that help us analyze and understand how you use this website. These cookies will be stored in your browser only with your consent. You also have the option to opt-out of these cookies. But opting out of some of these cookies may affect your browsing experience.
Necessary
Always Enabled
Necessary cookies are absolutely essential for the website to function properly. This category only includes cookies that ensures basic functionalities and security features of the website. These cookies do not store any personal information.
Non-necessary
Any cookies that may not be particularly necessary for the website to function and is used specifically to collect user personal data via analytics, ads, other embedded contents are termed as non-necessary cookies. It is mandatory to procure user consent prior to running these cookies on your website.
SAVE & ACCEPT