• Home
  • Knowledge Base
    • Licensing New (VIOSO 6, EXAPLAY)
    • Operation
    • Quality Improvement
    • References
    • Licensing Old (Anyblend, Player)
  • Documentation
    • VIOSO 6
    • VIOSO 6 Integration
    • EXAPLAY
    • VIOSO Core 5
    • VIOSO Anyblend 5
    • VIOSO Anyblend VR&SIM 5
    • VIOSO Integrate 5
    • VIOSO Player 2
  • FAQ
    • Error and other feedback
    • Licensing
    • System & Requirements
  • Videos
  • Home
  • Knowledge Base
    • Licensing New (VIOSO 6, EXAPLAY)
    • Operation
    • Quality Improvement
    • References
    • Licensing Old (Anyblend, Player)
  • Documentation
    • VIOSO 6
    • VIOSO 6 Integration
    • EXAPLAY
    • VIOSO Core 5
    • VIOSO Anyblend 5
    • VIOSO Anyblend VR&SIM 5
    • VIOSO Integrate 5
    • VIOSO Player 2
  • FAQ
    • Error and other feedback
    • Licensing
    • System & Requirements
  • Videos

VIOSO Core 5

home/Documentation/VIOSO Core 5
Expand All Collapse All
  • VIOSO Core Software Overview
  • Video tutorial: Demonstrating a full calibration procedure
  • VIOSO Core System requirements
  • System preparation
    • GPU setup
    • VNC setup/Remote setup
    • Projector setup/ alignment
    • Camera setup
      • VIOSO Calibration Kit v2 (HiK - from Nov. 2021)
      • VIOSO Calibration Kit v1 (IDS camera - legacy)
    • Prepare screen and testpattern
    • Configure VIOSO Anyblend to run as Master or Client
  • VIOSO Core main window explained
  • Calibration
    • Pre-Scan configuration
      • Display split
    • Camera settings / ROI
    • Projector masking
    • Scanning procedure
      • Pre-Scan: Brightness inspector
      • Pre-Scan: Dot Inspector
      • Pre-Scan: Noise Filter (optional)
      • Scan
      • Post-Scan: Geometric scan inspection
        • Geometry scan adjustments
      • Scan finished
    • Content Mapping and Warping
    • Save and finish
  • Adjustments and Optimizations
    • Projection masking
    • Warping
  • Export calibration
  • Automatic Recalibration

Scanning procedure

723 views 1

Emanuel
March 12, 2020

Before every scanning procedure, you can select if you want to perform the scan or use a previously-made scan.

  • This step is skipped if you have checked “force new geometric scan” in the settings of the previous dialog.


Select data source

You will see this dialog between the scan of each projector. You can find the number of the projector you are working on at the top of the window (1 out of 2 in this case).

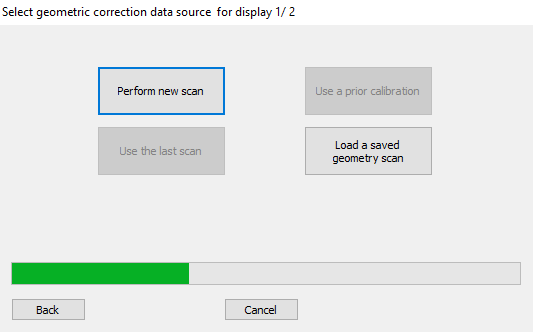
  • Perform a new scan- To start a new camera-based scan.
  • Use a prior calibration- Uses data from previous calibration. If you haven’t done a previous calibration, the button will be inactive.
  • Use the last scan- Uses data from the last scan made. If you haven’t done a previous scan, the button will be inactive.
  • Load a saved calibration- If you have a previous calibration saved, press here to open the file from disk. It accepts the “raw” calibration data (file ending *.bdi) that are created optionally in the post-scan adjustment (see here: Post Scan Adjustments).


Perform new scan

The scanning process will be done one projector at a time, so you will only see one part of the projection surface light up.

The scanning procedure per projector will consist of this:

  1. Pre-scan configuration (brightness & noise filter, dot pattern size).
  2. Scanning.
  3. Post-scan configuration (adjusting good/bad detection and extrapolation).


Click here to proceed to the next section (Perform new scan).


Was this helpful?

1 Yes  No
Related Articles
  • VIOSO Calibration Kit v2 (HiK – from Nov. 2021)
  • Geometry scan adjustments
  • Display split
  • Projection masking
  • Pre-Scan: Brightness inspector
  • Pre-Scan configuration

Didn't find your answer? Contact Us

Previous
Projector masking
Next
Pre-Scan: Brightness inspector
  • Ticket System
  • VIOSO Home
  • Imprint
  • Forum
  • © 2020-now VIOSO GmbH. All Rights Reserved.

We use cookies on our website to give you the most relevant experience by remembering your preferences and repeat visits. By clicking “Accept”, you consent to the use of ALL the cookies.
Do not sell my personal information.
Cookie settingsACCEPT
Manage consent

Privacy Overview

This website uses cookies to improve your experience while you navigate through the website. Out of these, the cookies that are categorized as necessary are stored on your browser as they are essential for the working of basic functionalities of the website. We also use third-party cookies that help us analyze and understand how you use this website. These cookies will be stored in your browser only with your consent. You also have the option to opt-out of these cookies. But opting out of some of these cookies may affect your browsing experience.
Necessary
Always Enabled
Necessary cookies are absolutely essential for the website to function properly. This category only includes cookies that ensures basic functionalities and security features of the website. These cookies do not store any personal information.
Non-necessary
Any cookies that may not be particularly necessary for the website to function and is used specifically to collect user personal data via analytics, ads, other embedded contents are termed as non-necessary cookies. It is mandatory to procure user consent prior to running these cookies on your website.
SAVE & ACCEPT