• Home
  • Knowledge Base
    • Licensing New (VIOSO 6, EXAPLAY)
    • Operation
    • Quality Improvement
    • References
    • Licensing Old (Anyblend, Player)
  • Documentation
    • VIOSO 6
    • VIOSO 6 Integration
    • EXAPLAY
    • VIOSO Core 5
    • VIOSO Anyblend 5
    • VIOSO Anyblend VR&SIM 5
    • VIOSO Integrate 5
    • VIOSO Player 2
  • FAQ
    • Error and other feedback
    • Licensing
    • System & Requirements
  • Videos
  • Home
  • Knowledge Base
    • Licensing New (VIOSO 6, EXAPLAY)
    • Operation
    • Quality Improvement
    • References
    • Licensing Old (Anyblend, Player)
  • Documentation
    • VIOSO 6
    • VIOSO 6 Integration
    • EXAPLAY
    • VIOSO Core 5
    • VIOSO Anyblend 5
    • VIOSO Anyblend VR&SIM 5
    • VIOSO Integrate 5
    • VIOSO Player 2
  • FAQ
    • Error and other feedback
    • Licensing
    • System & Requirements
  • Videos

VIOSO Core 5

home/Documentation/VIOSO Core 5
Expand All Collapse All
  • VIOSO Core Software Overview
  • Video tutorial: Demonstrating a full calibration procedure
  • VIOSO Core System requirements
  • System preparation
    • GPU setup
    • VNC setup/Remote setup
    • Projector setup/ alignment
    • Camera setup
      • VIOSO Calibration Kit v2 (HiK - from Nov. 2021)
      • VIOSO Calibration Kit v1 (IDS camera - legacy)
    • Prepare screen and testpattern
    • Configure VIOSO Anyblend to run as Master or Client
  • VIOSO Core main window explained
  • Calibration
    • Pre-Scan configuration
      • Display split
    • Camera settings / ROI
    • Projector masking
    • Scanning procedure
      • Pre-Scan: Brightness inspector
      • Pre-Scan: Dot Inspector
      • Pre-Scan: Noise Filter (optional)
      • Scan
      • Post-Scan: Geometric scan inspection
        • Geometry scan adjustments
      • Scan finished
    • Content Mapping and Warping
    • Save and finish
  • Adjustments and Optimizations
    • Projection masking
    • Warping
  • Export calibration
  • Automatic Recalibration

Pre-Scan: Dot Inspector

638 views 1

Emanuel
March 12, 2020

This is the most important visual feedback loop. Here, you specify the granularity of the test pattern that is used to retrieve the projector mapping and surface properties.

The result of the auto alignment depends on how this pattern is viewed and interpreted by the camera.

See here a video about handling the dot inspector:

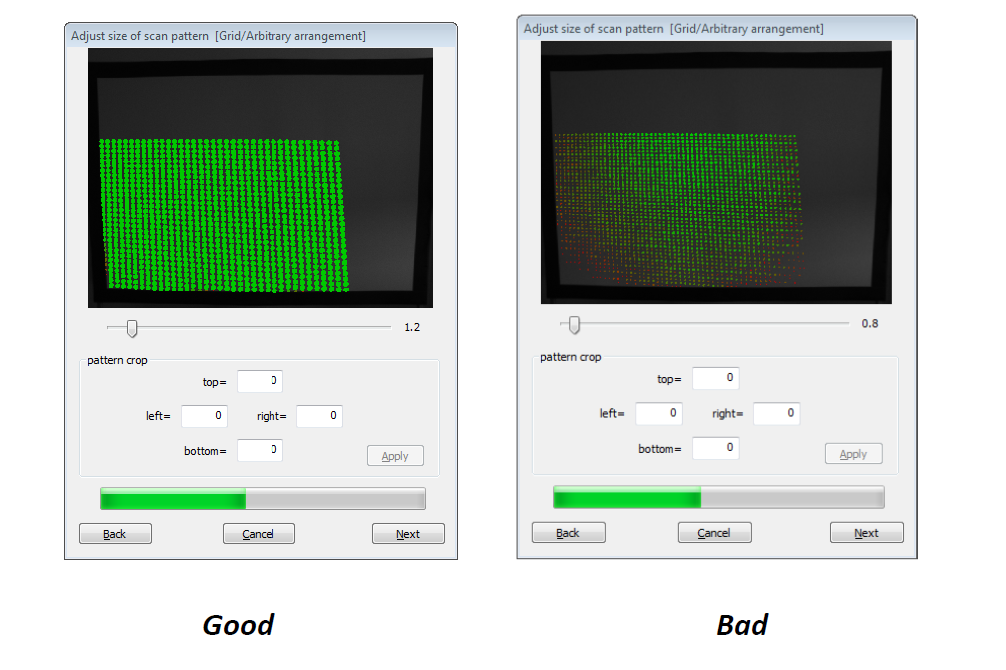
On the “adjust size of scan pattern” window, you should aim to see as many green dots as possible. Red dots should be avoided unless they are naturally occurring (e.g. by shooting over the projection area, having obstacles in the path of projection, etc.).

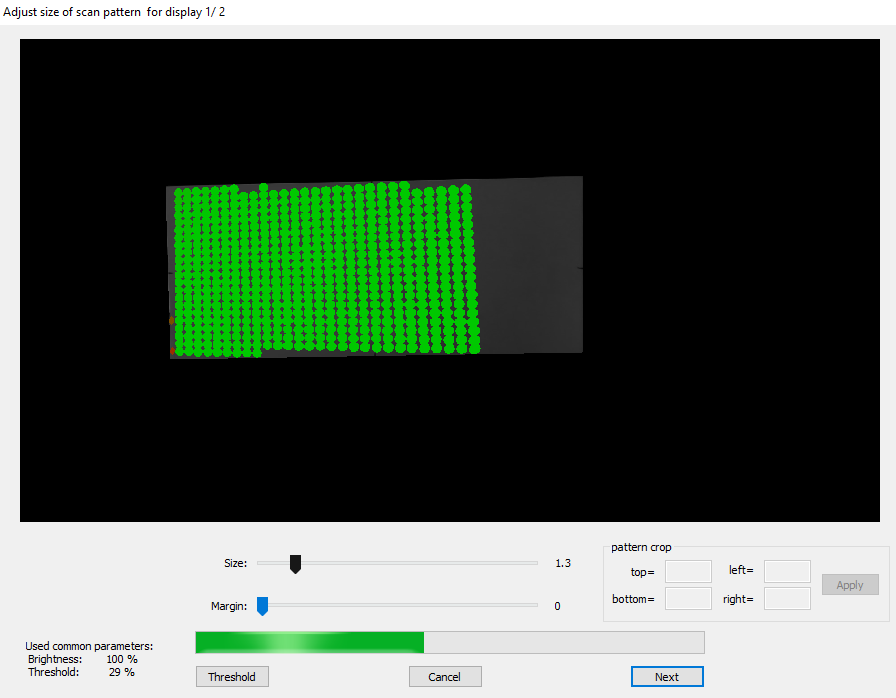
  • Size-  To change the size of the dots, glide the nob on the slider to make the dots bigger or smaller.
  • Margin- To change the space between the dots, glide the nob on the slider to make the spaces between the dots bigger or smaller.
  • Pattern crop- Leave out parts of the projection. This is useful if the projection results are unsatisfactory due to out-of-focus projectors, bad surfaces, etc.

To get optimal results from a calibration, external influences that may disrupt the scanning process must be avoided as much as possible.

In some cases, red or orange dots cannot be avoided. After you achieve the best result possible, click ‘Threshhold’ to check the threshold parameters or ‘Next’ to continue with the calibration.

The goal of this process is to get as much data on the projection surface as possible and the dots are a visual representation of information.

A green dot means the camera can detect and identify the spot correctly. The more green dots you have, the more information the system will have to work with and the more precise your calibration result will be.

A red dot means that the system can’t identify that space correctly and there is something interfering with the scan on that spot.

Your aim should be to get as many green dots as possible. There are some surfaces where a couple of red or orange dots will appear, this does not necessarily mean that your scan result will be bad, as the system can extrapolate and calculate the information missing on those spots. By minimizing trouble spots, you can make it easier for the system to get a good scan result.

Click here to proceed to the next section.


Was this helpful?

1 Yes  No
Related Articles
  • VIOSO Calibration Kit v2 (HiK – from Nov. 2021)
  • Geometry scan adjustments
  • Display split
  • Projection masking
  • Pre-Scan: Brightness inspector
  • Pre-Scan configuration

Didn't find your answer? Contact Us

Previous
Pre-Scan: Brightness inspector
Next
Pre-Scan: Noise Filter (optional)
  • Ticket System
  • VIOSO Home
  • Imprint
  • Forum
  • © 2020-now VIOSO GmbH. All Rights Reserved.

We use cookies on our website to give you the most relevant experience by remembering your preferences and repeat visits. By clicking “Accept”, you consent to the use of ALL the cookies.
Do not sell my personal information.
Cookie settingsACCEPT
Manage consent

Privacy Overview

This website uses cookies to improve your experience while you navigate through the website. Out of these, the cookies that are categorized as necessary are stored on your browser as they are essential for the working of basic functionalities of the website. We also use third-party cookies that help us analyze and understand how you use this website. These cookies will be stored in your browser only with your consent. You also have the option to opt-out of these cookies. But opting out of some of these cookies may affect your browsing experience.
Necessary
Always Enabled
Necessary cookies are absolutely essential for the website to function properly. This category only includes cookies that ensures basic functionalities and security features of the website. These cookies do not store any personal information.
Non-necessary
Any cookies that may not be particularly necessary for the website to function and is used specifically to collect user personal data via analytics, ads, other embedded contents are termed as non-necessary cookies. It is mandatory to procure user consent prior to running these cookies on your website.
SAVE & ACCEPT