• Home
  • Knowledge Base
    • Licensing New (VIOSO 6, EXAPLAY)
    • Operation
    • Quality Improvement
    • References
    • Licensing Old (Anyblend, Player)
  • Documentation
    • VIOSO 6
    • VIOSO 6 Integration
    • EXAPLAY
    • VIOSO Core 5
    • VIOSO Anyblend 5
    • VIOSO Anyblend VR&SIM 5
    • VIOSO Integrate 5
    • VIOSO Player 2
  • FAQ
    • Error and other feedback
    • Licensing
    • System & Requirements
  • Videos
  • Home
  • Knowledge Base
    • Licensing New (VIOSO 6, EXAPLAY)
    • Operation
    • Quality Improvement
    • References
    • Licensing Old (Anyblend, Player)
  • Documentation
    • VIOSO 6
    • VIOSO 6 Integration
    • EXAPLAY
    • VIOSO Core 5
    • VIOSO Anyblend 5
    • VIOSO Anyblend VR&SIM 5
    • VIOSO Integrate 5
    • VIOSO Player 2
  • FAQ
    • Error and other feedback
    • Licensing
    • System & Requirements
  • Videos

VIOSO Core 5

home/Documentation/VIOSO Core 5
Expand All Collapse All
  • VIOSO Core Software Overview
  • Video tutorial: Demonstrating a full calibration procedure
  • VIOSO Core System requirements
  • System preparation
    • GPU setup
    • VNC setup/Remote setup
    • Projector setup/ alignment
    • Camera setup
      • VIOSO Calibration Kit v2 (HiK - from Nov. 2021)
      • VIOSO Calibration Kit v1 (IDS camera - legacy)
    • Prepare screen and testpattern
    • Configure VIOSO Anyblend to run as Master or Client
  • VIOSO Core main window explained
  • Calibration
    • Pre-Scan configuration
      • Display split
    • Camera settings / ROI
    • Projector masking
    • Scanning procedure
      • Pre-Scan: Brightness inspector
      • Pre-Scan: Dot Inspector
      • Pre-Scan: Noise Filter (optional)
      • Scan
      • Post-Scan: Geometric scan inspection
        • Geometry scan adjustments
      • Scan finished
    • Content Mapping and Warping
    • Save and finish
  • Adjustments and Optimizations
    • Projection masking
    • Warping
  • Export calibration
  • Automatic Recalibration

Pre-Scan: Brightness inspector

761 views 1

Emanuel
March 12, 2020

The first step of the scanning process is the brightness inspector. Core will ask you to verify the brightness calculated by the system.

You can manually adjust the brightness of the testing pattern using the corresponding control; slide the nob on the bar to adjust the brightness.

  • Automatic- Click here if you would like the camera to recalculate the brightness automatically.

The visible color on the surface in the camera image must be optimized for color rendering that is as realistic as possible–not too dark or too bright.

If the system displays a low brightness, you can go back to the ‘Camera options’ and try changing the parameters to get a better result.

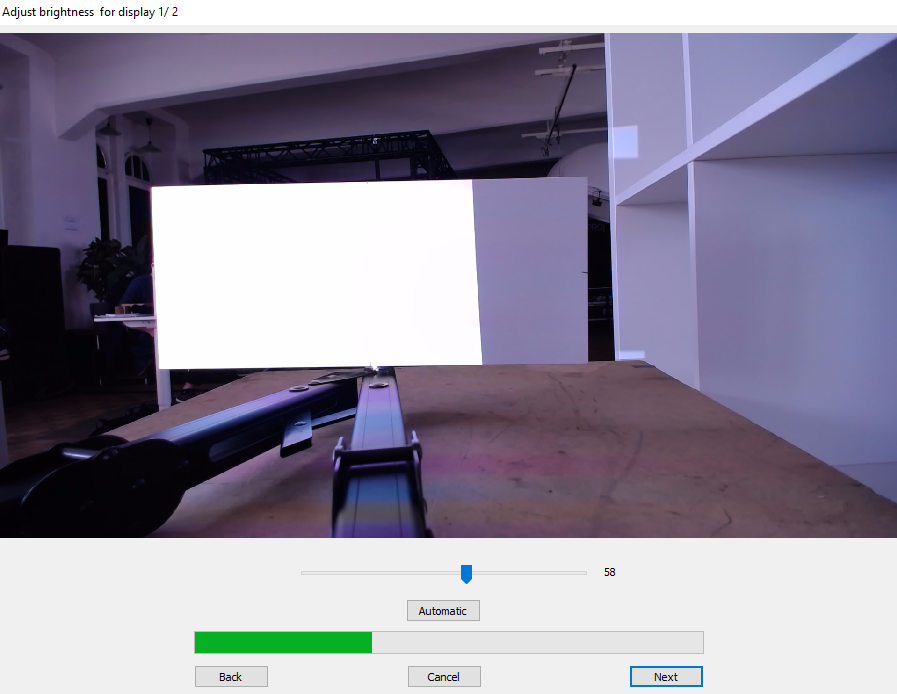
Once you are satisfied with the result on screen, click ‘Next’.

Click here to proceed to the next section.

Was this helpful?

1 Yes  No
Related Articles
  • VIOSO Calibration Kit v2 (HiK – from Nov. 2021)
  • Geometry scan adjustments
  • Display split
  • Projection masking
  • Pre-Scan configuration
  • GPU setup

Didn't find your answer? Contact Us

Previous
Scanning procedure
Next
Pre-Scan: Dot Inspector
  • Ticket System
  • VIOSO Home
  • Imprint
  • Forum
  • © 2020-now VIOSO GmbH. All Rights Reserved.

We use cookies on our website to give you the most relevant experience by remembering your preferences and repeat visits. By clicking “Accept”, you consent to the use of ALL the cookies.
Do not sell my personal information.
Cookie settingsACCEPT
Manage consent

Privacy Overview

This website uses cookies to improve your experience while you navigate through the website. Out of these, the cookies that are categorized as necessary are stored on your browser as they are essential for the working of basic functionalities of the website. We also use third-party cookies that help us analyze and understand how you use this website. These cookies will be stored in your browser only with your consent. You also have the option to opt-out of these cookies. But opting out of some of these cookies may affect your browsing experience.
Necessary
Always Enabled
Necessary cookies are absolutely essential for the website to function properly. This category only includes cookies that ensures basic functionalities and security features of the website. These cookies do not store any personal information.
Non-necessary
Any cookies that may not be particularly necessary for the website to function and is used specifically to collect user personal data via analytics, ads, other embedded contents are termed as non-necessary cookies. It is mandatory to procure user consent prior to running these cookies on your website.
SAVE & ACCEPT