• Home
  • Knowledge Base
    • Licensing
    • Operation
    • Quality Improvement
    • References
  • Documentation
    • VIOSO Core 5
    • VIOSO Anyblend 5
    • VIOSO Anyblend VR&SIM 5
    • VIOSO Integrate 5
    • VIOSO Player 2
  • FAQ
    • Error and other feedback
    • Licensing
    • System & Requirements
  • Videos
  • Home
  • Knowledge Base
    • Licensing
    • Operation
    • Quality Improvement
    • References
  • Documentation
    • VIOSO Core 5
    • VIOSO Anyblend 5
    • VIOSO Anyblend VR&SIM 5
    • VIOSO Integrate 5
    • VIOSO Player 2
  • FAQ
    • Error and other feedback
    • Licensing
    • System & Requirements
  • Videos

VIOSO Core 5

home/Documentation/VIOSO Core 5
Expand All Collapse All
  • VIOSO Core Software Overview
  • Video tutorial: Demonstrating a full calibration procedure
  • VIOSO Core System requirements
  • System preparation
    • GPU setup
    • VNC setup/Remote setup
    • Projector setup/ alignment
    • Camera setup
      • VIOSO Calibration Kit v4 (Daheng - from 2023)
      • VIOSO Calibration Kit v3 (HiK - from 2021)
      • VIOSO Calibration Kit v1&2 (IDS camera - legacy)
    • Prepare screen and testpattern
    • Configure VIOSO Anyblend to run as Master or Client
  • VIOSO Core main window explained
  • Calibration
    • Pre-Scan configuration
      • Display split
    • Camera settings / ROI
    • Projector masking
    • Scanning procedure
      • Pre-Scan: Brightness inspector
      • Pre-Scan: Dot Inspector
      • Pre-Scan: Noise Filter (optional)
      • Scan
      • Post-Scan: Geometric scan inspection
        • Geometry scan adjustments
      • Scan finished
    • Content Mapping and Warping
    • Save and finish
  • Adjustments and Optimizations
    • Projection masking
    • Warping
  • Export calibration
  • Automatic Recalibration

Warping

1363 views 2

Emanuel
March 17, 2020

VIOSO Core software provides numerous tools to map your content to the surface. This is called “warping” or “content mapping” – though it is always the same task.
Warping is referred to as “VC”, which is an abbreviation for “virtual canvas”. A virtual canvas consists of one or more projectors, so applying a warp is basically independent from the number of projectors used in a soft edge blended setup.

Table of Contents

  • Video tutorial
  • Warping toolbar
  • Warping Context Menu
  • Basic Warping (4-Point)
  • Extended Warping

Video tutorial

Warping toolbar

Undo (CTRL+Z)-
Undo an action. If you want to undo multiple actions, click multiple times.

Toggle scaling / deformation mode-
Scale or deform one point or all points.
Toggle line grippers (F2)-
Inserts a gripper between warping points.
Toggle tangents (F3)-
Adds a tangent to the selected point.

Keyboard fine or coarse points (F4)-
Use the arrow buttons on your keyboard to move a point, small or wider spaces.
More columns (F6)-
Adds a vertical column.
Less columns (F5)-
Erases a vertical column.
More rows (F8)-
Adds a horizontal row.
Less rows (F7)-
Erases a horizontal row.
Linear/bicubic interpolation-
When linear tangents and curved lines will disappear.
List undo stack-
Displays a list of warping modifications, go back to a past point in your warp.


Warping Context Menu

The warping area also contains a context menu that is available by right-clicking on the preview screen.

Basic Warping (4-Point)

A typical warping and mapping task is to align a misaligned projected image to a flat surface. The very basic usage of the warping tool, therefore, consists of a 4-point warping where each corner is handled accordingly:

Case 1- The sides of the projected image are different lengths, e.g. projectors are angled laterally. Drag the red corners to the smallest size of the projected image.
Case 2- The upper and lower sides of the projected image are different lengths, e.g. projectors are tilted vertically. Drag the red corners with the mouse in order to straighten the sides.
Case 3- The projected image is larger than the projection surface, e.g. projectors are too far away from the surface. Drag the red corners to the size of the projection surface using the mouse.
Case 4- All 4 sides of the projected image are different lengths, e.g. projectors are tilted laterally and vertically. Drag the red corners as shown in the illustration.


Extended Warping

In addition to the basic warping functionality, the warping feature supports nearly unlimited complexity of screen shaping and content mapping. By increasing the number of control points, complex warping grids can be established.


Extended warping functionality, available via context menu.


Right-click anywhere on the warping area. The context menu is displayed. It contains the entries “Grid Points X” and “Grid Points Y”, in addition to two entries to select the interpolation and extrapolation method, all of which refer to the extended warping functionality. You can also change these settings in the “warping dialogue”. You will find it by selecting “Warp” and then clicking ‘Options’.

  • Grid columns and rows- Use this function to insert warping points on the horizontal and vertical axises.

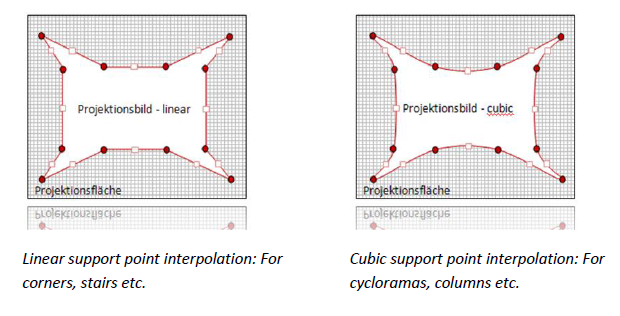
  • Interpolation method- Here you switch between linear and cubic support point interpolation. Linear interpolation is suitable for corners, edges, etc., while cubic interpolation is suitable for rounded surfaces. Cubic interpolation is the default.

  • Extrapolation method- This is where you select the extrapolation method used for cubic warping. The changes affect the details. Making changes to these settings is generally not required.


Was this helpful?

2 Yes  No
Related Articles
  • Geometry scan adjustments
  • Display split
  • Projection masking
  • Pre-Scan: Brightness inspector
  • Pre-Scan configuration
  • GPU setup

Didn't find your answer? Contact Us

Previous
Projection masking
Next
Export calibration
  • Ticket System
  • VIOSO Home
  • Imprint
  • © 2020-now VIOSO GmbH. All Rights Reserved.

We use cookies on our website to give you the most relevant experience by remembering your preferences and repeat visits. By clicking “Accept”, you consent to the use of ALL the cookies.
Do not sell my personal information.
Cookie settingsACCEPT
Manage consent

Privacy Overview

This website uses cookies to improve your experience while you navigate through the website. Out of these, the cookies that are categorized as necessary are stored on your browser as they are essential for the working of basic functionalities of the website. We also use third-party cookies that help us analyze and understand how you use this website. These cookies will be stored in your browser only with your consent. You also have the option to opt-out of these cookies. But opting out of some of these cookies may affect your browsing experience.
Necessary
Always Enabled
Necessary cookies are absolutely essential for the website to function properly. This category only includes cookies that ensures basic functionalities and security features of the website. These cookies do not store any personal information.
Non-necessary
Any cookies that may not be particularly necessary for the website to function and is used specifically to collect user personal data via analytics, ads, other embedded contents are termed as non-necessary cookies. It is mandatory to procure user consent prior to running these cookies on your website.
SAVE & ACCEPT