• Home
  • Knowledge Base
    • Licensing
    • Operation
    • Quality Improvement
    • References
  • Documentation
    • VIOSO Core 5
    • VIOSO Anyblend 5
    • VIOSO Anyblend VR&SIM 5
    • VIOSO Integrate 5
    • VIOSO Player 2
  • FAQ
    • Error and other feedback
    • Licensing
    • System & Requirements
  • Videos
  • Home
  • Knowledge Base
    • Licensing
    • Operation
    • Quality Improvement
    • References
  • Documentation
    • VIOSO Core 5
    • VIOSO Anyblend 5
    • VIOSO Anyblend VR&SIM 5
    • VIOSO Integrate 5
    • VIOSO Player 2
  • FAQ
    • Error and other feedback
    • Licensing
    • System & Requirements
  • Videos

VIOSO Core 5

home/Documentation/VIOSO Core 5
Expand All Collapse All
  • VIOSO Core Software Overview
  • Video tutorial: Demonstrating a full calibration procedure
  • VIOSO Core System requirements
  • System preparation
    • GPU setup
    • VNC setup/Remote setup
    • Projector setup/ alignment
    • Camera setup
      • VIOSO Calibration Kit v4 (Daheng - from 2023)
      • VIOSO Calibration Kit v3 (HiK - from 2021)
      • VIOSO Calibration Kit v1&2 (IDS camera - legacy)
    • Prepare screen and testpattern
    • Configure VIOSO Anyblend to run as Master or Client
  • VIOSO Core main window explained
  • Calibration
    • Pre-Scan configuration
      • Display split
    • Camera settings / ROI
    • Projector masking
    • Scanning procedure
      • Pre-Scan: Brightness inspector
      • Pre-Scan: Dot Inspector
      • Pre-Scan: Noise Filter (optional)
      • Scan
      • Post-Scan: Geometric scan inspection
        • Geometry scan adjustments
      • Scan finished
    • Content Mapping and Warping
    • Save and finish
  • Adjustments and Optimizations
    • Projection masking
    • Warping
  • Export calibration
  • Automatic Recalibration

Pre-Scan: Noise Filter (optional)

710 views 2

Emanuel
March 13, 2020

This is an optional step to use if you have trouble achieving “good” dots. To get to this window, click on the ‘Threshold’ button on the Dot inspector window.

See here a video how to handle the noise filter:

The noise filter inspector provides a visual feedback from a projected line pattern viewed by the camera.


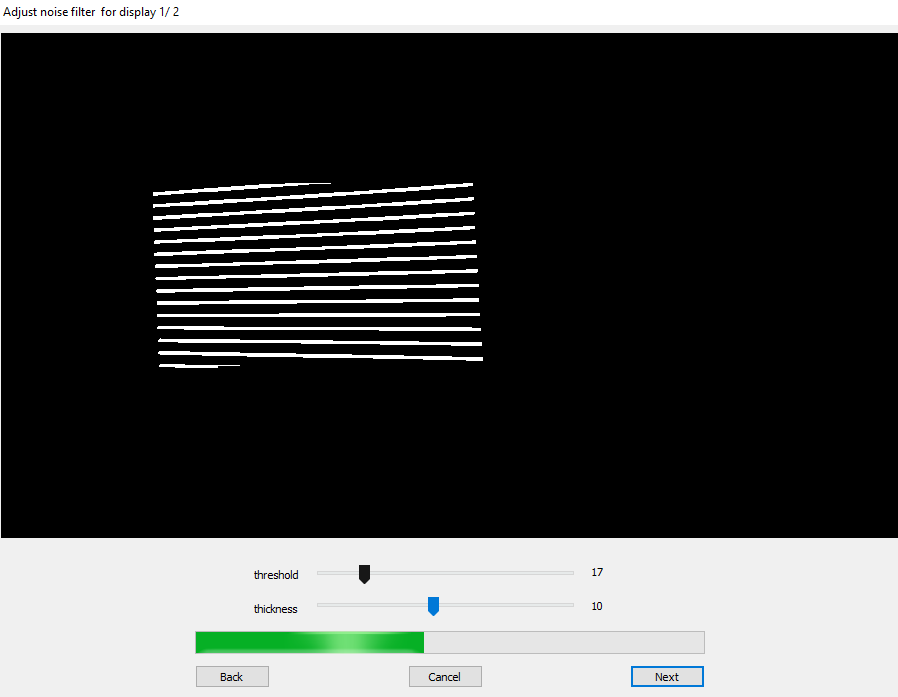
  •  Threshold- Glide the nob on the threshold slide bar to adjust noise levels. The aim is to have as little noise as possible. Set the threshold level so that all lines are easily visible at the edges and in the corners of the test image (striped pattern). However, be sure to avoid visible interference (noise)!
  • Thickness- To adjust line size, glide the nob on the thickness slide bar. Smaller or thicker lines will influence the duration of the scan and how precise the result will be.

The line thickness should primarily be selected so that the lines are continuous. Thin lines are preferable, since thick lines are related to the risk of excessive camera brightness.

The objective is to obtain continuous lines with no visible camera interference (see illustration below). The obvious goal is to have visible noise suppressed as much as possible without influencing the lines too much. In other words, set the noise filter only to a value that noise disappears, but not influencing the lines. Experiment with the controls in order to achieve optimal results.

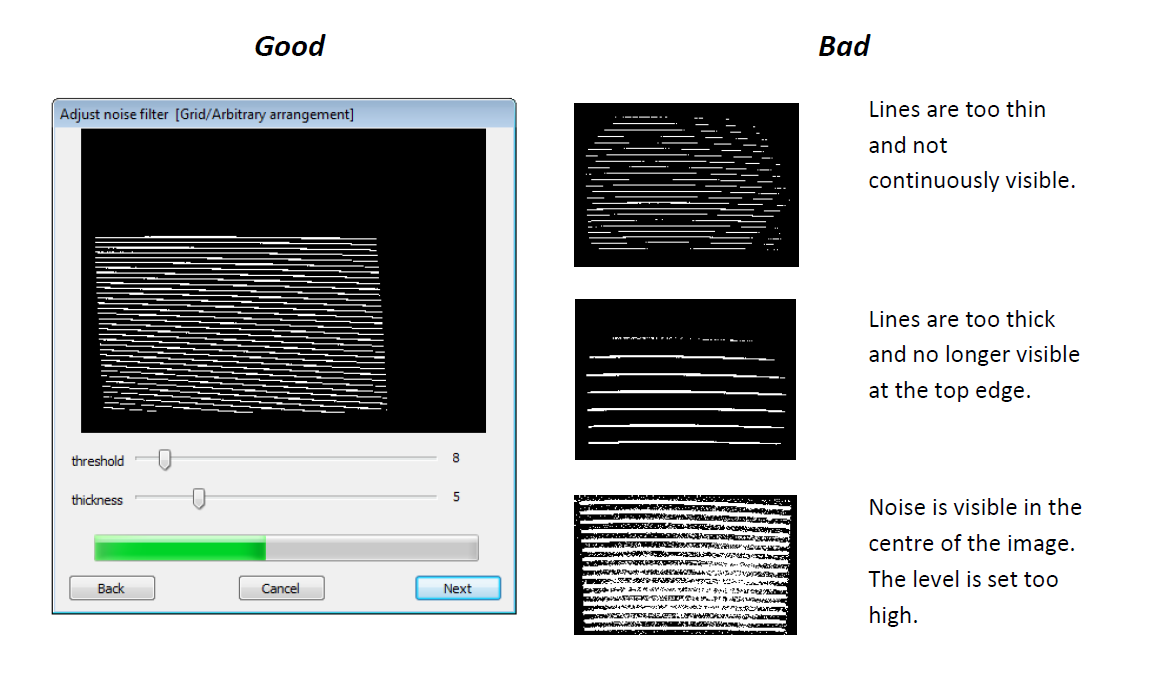
Once you click ‘Next’, you will be taken back to the dot inspector window. If the dot pattern looks correct, press ‘Next’ again to continue the calibration process.

Click here to proceed with the next section.

Was this helpful?

2 Yes  No
Related Articles
  • Geometry scan adjustments
  • Display split
  • Projection masking
  • Pre-Scan: Brightness inspector
  • Pre-Scan configuration
  • GPU setup

Didn't find your answer? Contact Us

Previous
Pre-Scan: Dot Inspector
Next
Scan
  • Ticket System
  • VIOSO Home
  • Imprint
  • © 2020-now VIOSO GmbH. All Rights Reserved.

We use cookies on our website to give you the most relevant experience by remembering your preferences and repeat visits. By clicking “Accept”, you consent to the use of ALL the cookies.
Do not sell my personal information.
Cookie settingsACCEPT
Manage consent

Privacy Overview

This website uses cookies to improve your experience while you navigate through the website. Out of these, the cookies that are categorized as necessary are stored on your browser as they are essential for the working of basic functionalities of the website. We also use third-party cookies that help us analyze and understand how you use this website. These cookies will be stored in your browser only with your consent. You also have the option to opt-out of these cookies. But opting out of some of these cookies may affect your browsing experience.
Necessary
Always Enabled
Necessary cookies are absolutely essential for the website to function properly. This category only includes cookies that ensures basic functionalities and security features of the website. These cookies do not store any personal information.
Non-necessary
Any cookies that may not be particularly necessary for the website to function and is used specifically to collect user personal data via analytics, ads, other embedded contents are termed as non-necessary cookies. It is mandatory to procure user consent prior to running these cookies on your website.
SAVE & ACCEPT