• Home
  • Knowledge Base
    • Licensing
    • Operation
    • Quality Improvement
    • References
  • Documentation
    • VIOSO Core 5
    • VIOSO Anyblend 5
    • VIOSO Anyblend VR&SIM 5
    • VIOSO Integrate 5
    • VIOSO Player 2
  • FAQ
    • Error and other feedback
    • Licensing
    • System & Requirements
  • Videos
  • Home
  • Knowledge Base
    • Licensing
    • Operation
    • Quality Improvement
    • References
  • Documentation
    • VIOSO Core 5
    • VIOSO Anyblend 5
    • VIOSO Anyblend VR&SIM 5
    • VIOSO Integrate 5
    • VIOSO Player 2
  • FAQ
    • Error and other feedback
    • Licensing
    • System & Requirements
  • Videos

VIOSO Integrate 5

home/Documentation/VIOSO Integrate 5
Expand All Collapse All
  • VIOSO Integrate Overview
  • VIOSO Integrate VS Integrate Plus
  • Media Playback Solutions
    • AV Stumpfl Pixera
      • Running Pixera Autocal standalone
      • UV-Mapping and 3D calibration
      • Multi-client setups
    • Vertex VIOSO & IOVERSAL Vertex
      • AutoCal Single Camera: Getting started
      • Modifying, Optimizing and Recalibration
      • Using Autocal Standalone
  • Dome- and Planetarium Solutions
  • 3D Engines
    • Unity Plugin
    • Unreal Engine Integration
      • Examples: UE4.24-.26
      • Examples: UE4.27 & UE5
    • MiddleVR Integration
    • Techviz
  • Simulators
    • SILAB
    • Quantum 3D: Mantis
    • AVSimulation: SCANeR Studio
    • rFpro
    • Prepar3D
    • X-Plane 11
  • Projector Integration
    • Barco Pulse Export
    • Norxe Export
  • VIOSO WarpBlend API
    • API usage on Windows
    • API usage on Linux
    • Implementation Remarks
    • VIOSOWarpBlend.ini Reference
    • API Examples
      • Example 1 - Simulator with moving platform
      • Example 2 - Another simulator with moving platform
      • Example 3 – Cave
      • Example 4 – Video player

Running Pixera Autocal standalone

1167 views 0

Emanuel
February 3, 2021

For simple setups, there is normally no reason to run Pixera Autocal stand alone.

Table of Contents

  • These workflows require running it stand alone
  • Running “Pixera Autocal” standalone
    • There are two editions of Pixera Autocal:
    • How to launch Pixera Autocal
      • Launching Pixera Autocal fails
  • Transfer the result back to Pixera
    • 1. Exporting
    • 2. Loading in Pixera

These workflows require running it stand alone

  • UV-Mapping and 3D calibration
  • Multi-client environments
  • Multi-camera based calibrations

Please refer to the specific chapters linked above to learn how to handle each of these aspects.

Running “Pixera Autocal” standalone

There are more complex scenarios, where a more fine-tuned operation is required, than the “one-stop” solution shown above. For such use-cases it is possible to run PIXERA Autocal independed from PIXERA. There are several aspects that is required to know and understand:

There are two editions of Pixera Autocal:

Edition Autocal Autocal Plus
fully integrated with Pixera yes no
single camera autoalignment yes yes
2D content mapping yes yes
3D content mapping (UV-Mapping) no yes
multi-camera autoalignment no yes
advanced blacklevel correction no (soon available)

Pixera Autocal Plus always needs to be launched stand-alone

Pixera Autocal is licensed by Pixera itself. You need to have a fully licensed Pixera dongle including Autocal or Autocal Plus license.

How to launch Pixera Autocal

  1. To launch Pixera Autocal, you need to launch Pixera first. There is no need to load a specific project – simply have Pixera running (using a dongle with an appropriate license for Pixera Autocal or Pixera Autocal Plus)
  2. Make sure to have no output running by Pixera.
  3. Now you can navigate to the Pixera installation folder and run Pixera Autocal from there.

Pixera Autocal executables are located within the program folder:
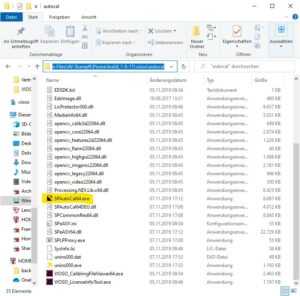
Edition Path to exectuable
Autocal [pixera install folder]\vioso\autocal\SPAutoCal64.exe
Autocal Plus [pixera install folder]\vioso\autocal plus\SPAutoCal64.exe

Make sure to launch the Autocal executable that matches the license on the Pixera dongle.

Launching Pixera Autocal fails

This window pops up, if Pixera Autocal is launchen without having Pixera running:

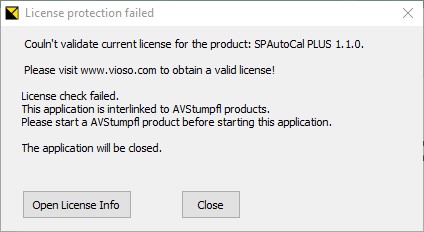
In this case, launch Pixera (no need to start a specific project) and then launch Pixera Autocal again.

Transfer the result back to Pixera

The feed back to Pixera consists of two actions:

  1. Exporting into *.vwf format (done by Pixera Autocal)
  2. Loading *.vwf files in Pixera
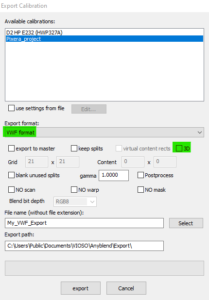
1. Exporting

After the calibration is done, select “File – Export” and select as Export format “VWF format”. This creates one *.vwf file in the destination folder you specify in the Export path below.

Click the checkbox “3D” if you calibrated your screen with a UV-Map.

Learn here more details about the various export features: /documentation/core-export-calibration/


2. Loading in Pixera

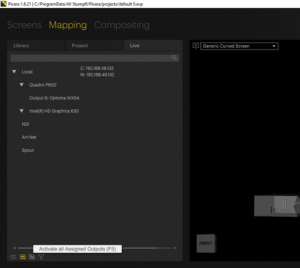
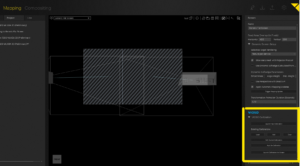
The functionality to load *.vwf files is found in the screen properties within the Mapping tab:

Clicking on load will open the following window including name of selected screen & physical outputs assigned to this screen :

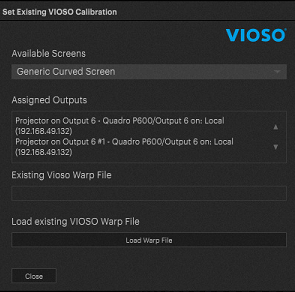
Then, you need to click on the hidden button under “Existing Vioso Warp File” to open the file explorer and select your .vwf file :

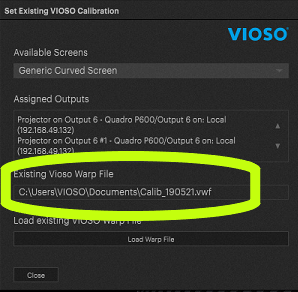
Once you see the path written in the box, just press “Load warp file” and your VIOSO calibration will be loaded inside your screen inside Pixera.

You are now free to activate/deactivate that calibration in the mapping tab of Pixera (shortcut is F5) :

Was this helpful?

Yes  No
Related Articles
  • Barco Pulse Export
  • Examples: UE4.24-.26
  • SILAB
  • Quantum 3D: Mantis
  • VIOSO Integrate Overview
  • Norxe Export

Didn't find your answer? Contact Us

Previous
AV Stumpfl Pixera
Next
UV-Mapping and 3D calibration
  • Ticket System
  • VIOSO Home
  • Imprint
  • © 2020-now VIOSO GmbH. All Rights Reserved.

We use cookies on our website to give you the most relevant experience by remembering your preferences and repeat visits. By clicking “Accept”, you consent to the use of ALL the cookies.
Do not sell my personal information.
Cookie settingsACCEPT
Manage consent

Privacy Overview

This website uses cookies to improve your experience while you navigate through the website. Out of these, the cookies that are categorized as necessary are stored on your browser as they are essential for the working of basic functionalities of the website. We also use third-party cookies that help us analyze and understand how you use this website. These cookies will be stored in your browser only with your consent. You also have the option to opt-out of these cookies. But opting out of some of these cookies may affect your browsing experience.
Necessary
Always Enabled
Necessary cookies are absolutely essential for the website to function properly. This category only includes cookies that ensures basic functionalities and security features of the website. These cookies do not store any personal information.
Non-necessary
Any cookies that may not be particularly necessary for the website to function and is used specifically to collect user personal data via analytics, ads, other embedded contents are termed as non-necessary cookies. It is mandatory to procure user consent prior to running these cookies on your website.
SAVE & ACCEPT