• Home
  • Knowledge Base
    • Licensing New (VIOSO 6, EXAPLAY)
    • Operation
    • Quality Improvement
    • References
    • Licensing Old (Anyblend, Player)
  • Documentation
    • VIOSO 6
    • VIOSO 6 Integration
    • EXAPLAY
    • VIOSO Core 5
    • VIOSO Anyblend 5
    • VIOSO Anyblend VR&SIM 5
    • VIOSO Integrate 5
    • VIOSO Player 2
  • FAQ
    • Error and other feedback
    • Licensing
    • System & Requirements
  • Videos
  • Home
  • Knowledge Base
    • Licensing New (VIOSO 6, EXAPLAY)
    • Operation
    • Quality Improvement
    • References
    • Licensing Old (Anyblend, Player)
  • Documentation
    • VIOSO 6
    • VIOSO 6 Integration
    • EXAPLAY
    • VIOSO Core 5
    • VIOSO Anyblend 5
    • VIOSO Anyblend VR&SIM 5
    • VIOSO Integrate 5
    • VIOSO Player 2
  • FAQ
    • Error and other feedback
    • Licensing
    • System & Requirements
  • Videos

VIOSO Anyblend VR&SIM 5

home/Documentation/VIOSO Anyblend VR&SIM 5
Expand All Collapse All
  • VIOSO Anyblend VR&SIM Software Overview
  • 3D calibration
    • 3D model creation
    • 3D Alignment (MRD Adjustment)
    • Re-calculate calibration blending (optional)
  • Multi-client Calibration
    • Method 1: Abstract Displays
    • Method 2: Legacy
  • Multi-Camera Calibration
    • Method 1: 3D Alignment based multi-cam
    • Method 2: Marker based multi-cam
  • Intrinsic and Positions
  • Content space management
  • Content space transformation
  • Observer Conversion for Static Eye-Point
  • Dynamic eye-point correction
  • Calibration Export
  • Anyblend VR&SIM Examples
    • Export for Barco WB2560 (MIPS)
    • Calibration of a partial dome screen with an off-centre camera

Re-calculate calibration blending (optional)

615 views 0

Emanuel
March 31, 2020

When a calibration is made using 3D modeling and custom content space conversion via 3D alignment (MRD adjustment), the blending can be recalculated using this data. Usually it allows for significant improvements to the blending quality.

To do this, the following is required:

  • A finished calibration with 3D data, which means the calibration was performed with the custom content space conversion.
    Or
  • The calibration was performed fish eye to panorama cylinder conversion (old versions).
    Or
  • The calibration was performed with a fish eye to dome conversion.

In order to re-calculate the blending, follow these steps:

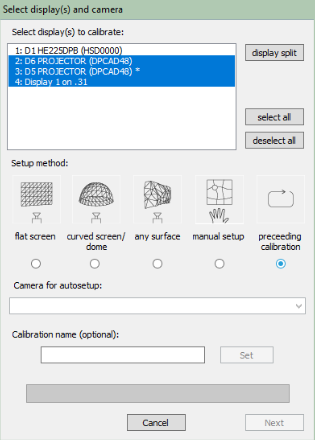
  • Step 1- Click “Calibrate”.
  • Step 2- Check that all projectors are selected.
  • Step 3- Select the option “Proceeding calibration”.
  • Step 4- Give a name to your new re-blended compound in the “Calibration name field”.
  • Step 5- Click ‘Next’.

Finally, choose the projector layout. Note that now you are free to choose horizontal strip, as we are not calculating from the fish-eye camera perspective, but on the 3D model texture.

Was this helpful?

Yes  No
Related Articles
  • Method 1: 3D Alignment based multi-cam
  • Method 2: Marker based multi-cam
  • Method 1: Abstract Displays
  • Method 2: Legacy
  • Export for Barco WB2560 (MIPS)
  • 3D model creation

Didn't find your answer? Contact Us

Previous
3D Alignment (MRD Adjustment)
Next
Multi-client Calibration
  • Ticket System
  • VIOSO Home
  • Imprint
  • Forum
  • © 2020-now VIOSO GmbH. All Rights Reserved.

We use cookies on our website to give you the most relevant experience by remembering your preferences and repeat visits. By clicking “Accept”, you consent to the use of ALL the cookies.
Do not sell my personal information.
Cookie settingsACCEPT
Manage consent

Privacy Overview

This website uses cookies to improve your experience while you navigate through the website. Out of these, the cookies that are categorized as necessary are stored on your browser as they are essential for the working of basic functionalities of the website. We also use third-party cookies that help us analyze and understand how you use this website. These cookies will be stored in your browser only with your consent. You also have the option to opt-out of these cookies. But opting out of some of these cookies may affect your browsing experience.
Necessary
Always Enabled
Necessary cookies are absolutely essential for the website to function properly. This category only includes cookies that ensures basic functionalities and security features of the website. These cookies do not store any personal information.
Non-necessary
Any cookies that may not be particularly necessary for the website to function and is used specifically to collect user personal data via analytics, ads, other embedded contents are termed as non-necessary cookies. It is mandatory to procure user consent prior to running these cookies on your website.
SAVE & ACCEPT