Abstract displays is a feature that allows you to transfer local displays on client machines to the master machine as virtual/abstract displays.
VIOSO Core will consider the transferred displays/projectors as locally connected displays, while projectors are still connected to client servers. This means once everything is configured, you perform your calibration on the master in single client mode.
The information of transferred displays is stored in the Master system file: SPSurDef.ini.
There are two methods to configure it:
- Automatic generation: Abstract Display Configurator tool
- Manual configuration
NOTE: Before you configure remote displays you need to check the following conditions:
-
- Servers are on the same network.
- Ports are not blocked or closed (default is 8080). Check the firewall settings for this step.
- Your clients are up and running.
- VIOSO software is configured as client/master on each machine.
- VIOSO software is up and running on each machine.
1. Automatic generation via Abstract Display Configurator
This program is a configuration tool for multi-client (multi IGs) abstract displays. It lets you add Clients via IP address, automatically retrieves their connected displays, and then generates a SPSsurDef.ini File in its default location.
Step-by-step guide to generate the abstract display configuration:
- Connect your clients (IGs) to the same network and make sure they are up and running with VIOSO Calibrator launched and configured on each.
- Open “
Abstract Display Configurator.exe”:

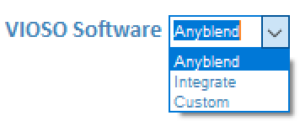
- Choose the target VIOSO Software from the drop down menu: Anyblend, Integrate or Custom (lets you choose the destination folder for the SPSurdef.ini file).

- Add your first client: Choose a “Name” and type in its “IP address” in the corresponding fields.
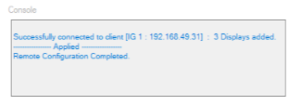
- Click on the “Add” button. If the connection to the client was successful, the console will display a message like this:

- Repeat steps 3 & 4 until you’ve added all of your clients.
- Click the “Apply” button to save and complete the configuration. The console will display “Remote Configuration Completed”:

Now open VIOSO Core and you should see your displays in the “target” menu available for calibration. Now that all your displays are configured locally on the master, you can treat your workflow as a single client calibration.

Notes
- You can click on an added display in the list and “Rename“/”Delete“/”Split” it.
- The “Reset” button lets you re-initialize the configuration and start over from scratch.
- Don’t forget to click the “Apply” button before you exit to save your configuration.
2. Manual configuration
This is the most basic way and requires more time, but it’s suited to repair an existing Abstract Display configuration in case of failure.
Open the “SPSurDef.ini” file located in under:
C:\ProgramData\VIOSO\Anyblend5
Contents of a “SPSurDef.ini” file:
<?xml version="1.0"?>
<VIOSO>
<File version="1.0.0" build="1234"/>

  <logicalDisplay name="Abs01" idString="ABSDEVICE\DISPLAY\{6B25DFF9-B88F-4277-83CA-DFCEEC31C217}\0000" >
    <topology rows="1" cols="1" />
    <display iRow="0" iCol="0" posX="0" posY="0" sizeX="1920" sizeY="1080" core="192.168.2.20" />
  </logicalDisplay>

  <logicalDisplay name="Abs02" idString="ABSDEVICE\DISPLAY\{4E0A13AB-FEDB-443F-A102-B817B71C628B}\0000" >
    <topology rows="1" cols="1" />
    <display iRow="0" iCol="0" posX="1920" posY="0" sizeX="1920" sizeY="1080" core="192.168.2.21" />
  </logicalDisplay>

</VIOSO>
Each entry of <logicalDisplay> will represent the projector connection transferred from client to master. The parameters to edit are the following:
-
name: Here you can define a name for the projector, examplename="LeftProjector_Client1" -
idString: set a unique ID for the transferred display in the following form"ABSDEVICE\DISPLAY\{PASTE NEW GUID HERE}\0000"
To generate the GUID, you can use the VIOSO_GenerateGUID tool located under:
C:\Program files\VIOSO Anyblend 5 VR&SIM\Shared tools\VIOSO_GenerateGUID.exe

-
posX posY sizeX sizeYrepresent the display coordinates and resolution of the remote projector. You can type this data from your knowledge of the setup or retrieve them with this method:-
- Open a browser and enter the following link using your corresponding client IP address :
http://192.x.x.x:8080/info.htm?displays&fmt - The result is shown below, you can use the Size (x,y) and Position (x,y) to fill out your
SPSurDef.inifile parameters

- Open a browser and enter the following link using your corresponding client IP address :
-
-
coreIP address of the remote projector. example: core=”192.168.2.21″
Make a new entry for each projector you need to calibrate.
At the end you will have a SPSurDef.ini file where all projectors on all clients will be listed as logicalDisplay entries. Once you are done, Save the file.
Restart the Core or Player on the Master machine. Then you will see your projectors appearing in the target menu available for calibration.
Now that all your displays are configured locally on the master, you can treat your workflow as a single client calibration.

