
Hardware setup
In general, the hardware setup consists of several PC’s running the same version of VIOSO Core.
For a camera-based auto calibration, we need one or more cameras. Best practice is to use as few cameras as possible because the cameras have to be extra warped. This is due to the fact that intrinsic parameters do not describe the lens completely.
There are no restrictions in brand or lens, but there are a couple of things to keep in mind:
- All cameras must use DirectShow or Datapath Vision® interface.
- Use the same model and lens in case you want to use automatic brightness and color matching.
- Every projector must be “seen” completely by one camera.
- The resolution should not be less than a quarter of the corresponding projectors.
- Each PC needs the camera signal of all cameras needed for its projector(s).
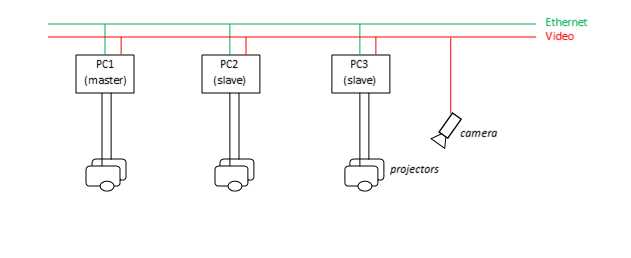
Please use gigabit or better network adapters because all data from the client has to be transferred to the master while calculating the blend. Please be sure the master has enough RAM to handle this.
Preparations
Configure VIOSO Core on every PC to use an IP address of the same subnet. I.e. 192.168.0.1 to 192.168.0.n enumerated continuously. Make sure to configure your network adapter’s IPv4 or your DHCP server appropriately.
Make sure that your Windows Firewall is set to notify for new programs or add a rule for SPCalibrator.exe.
Start VIOSO Core on each client. Check the settings by going to Options->Settings:
- Program->Common: select or mind the data path.
- Calibration->Multi client: select your network adapter and enable it.
Opposite of a single-client calibration, you cannot split the displays while doing the calibration, so you have to split your Mosaic® or Eyefinity® groups according to the physical outputs. Do this on every client’s SPCalibrator via Options->Screen split.
Before starting a calibration, you must figure the correct settings for all cameras. You can do this client-by-client and projector-by-projector. Make sure all cameras use the SAME settings and the brightest projector gets measured in brightness to 75-99%. If the darkest lies beneath 40%, you should reconsider your setup, i.e. by moving it towards the screen.
Keep in mind that all best practice considerations of a single-client calibration apply for multi-client calibrations as well.
Starting a Multi-client autocalibration with one camera
VIOSO Core does not work on a classic master-client architecture. Some things are a little different.
- You need to start VIOSO Calibrator on every client. You can even load it minimized (command line option /m).
- Data is kept on every client itself. Be sure to configure the data directory properly as multi-client calibration files go there.
- If you load a settings file on a PC and press Preview with the Super Compound selected, the settings are loaded, if not already available.
- You have to load the settings file on all clients if you want to re-calibrate! You can do that by adding a command line parameter “/l: D:\path\to\settings.sps”. Keep the quotation marks, as white spaces will be interpreted as a parameter separator.
Click the ‘Calibrate’ button on the main Core window or go to the Calibration menu and click ‘Start Calibration’.
Click on ‘Multi client calibration’.
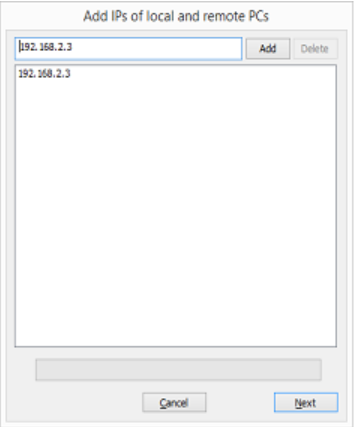
Add IP’s of all participating PCs and the IP of the master by entering the IP-address or computer name to the text field and press Add. Once finished, press ‘Next’.
You will get an error message if not all clients can be accessed. In this case, please double check the clients network and firewall settings. Network communication will not work between clients with different versions!
Next you can select participating displays. The displays are fired up with a checker board to indicate their use.
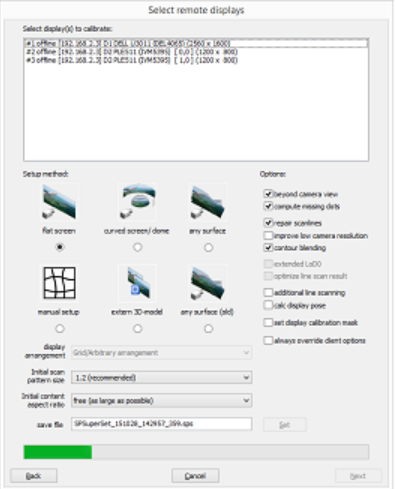
Please double check split settings here. Every projector must have its own display on the list. You cannot calibrate parts or multiple projectors in this process. If the configuration is wrong, please cancel and go back to “Options” and to the “Screen split” on each affected client.
Now select preset options for the setup. Keep in mind that the setup method cannot be changed later. Choose a name for your setup and press ‘Next’.
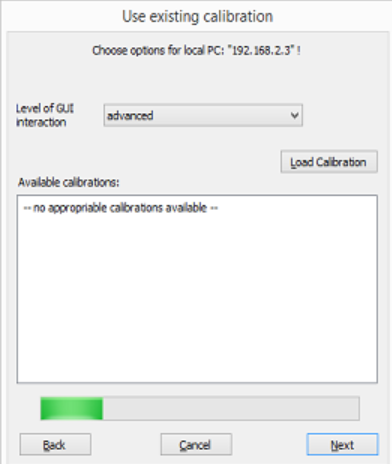
If a calibration already exists on the client, it will be listed now. If you keep it selected, no measurements will be done.
This mode enables you to quickly combine calibrations separately done or loaded on the clients. This is an easy way of blending several clients measured by the same camera.
If you want to redo the measurement, un-select all calibrations. Then press ‘Next’.
Now a single-client calibration is started on the client. For information, refer to the VIOSO Core calibration section.
The user interface is mirrored to the master, so you can do everything except camera settings from here.